
Introduction
Summer gatherings, particularly around Independence Day, call for festive and delicious desserts that celebrate the spirit of the season. Red, white, and blue desserts not only add visual appeal to your table but also tantalize taste buds with a variety of flavors and textures. These vibrant treats inspire a sense of patriotism while enhancing the festive atmosphere of your celebrations. Whether you are hosting a barbecue, a picnic, or a family reunion, these desserts will surely impress your guests and make your festivities unforgettable.
In this article, we will explore 15 unique recipes for red, white, and blue desserts that will elevate your holiday celebrations. From creamy cheesecakes to refreshing popsicles, you’ll find an array of mouthwatering options to satisfy any sweet tooth. Each recipe is crafted to be both visually stunning and delightful in taste, ensuring that your dessert table becomes a highlight of the event.
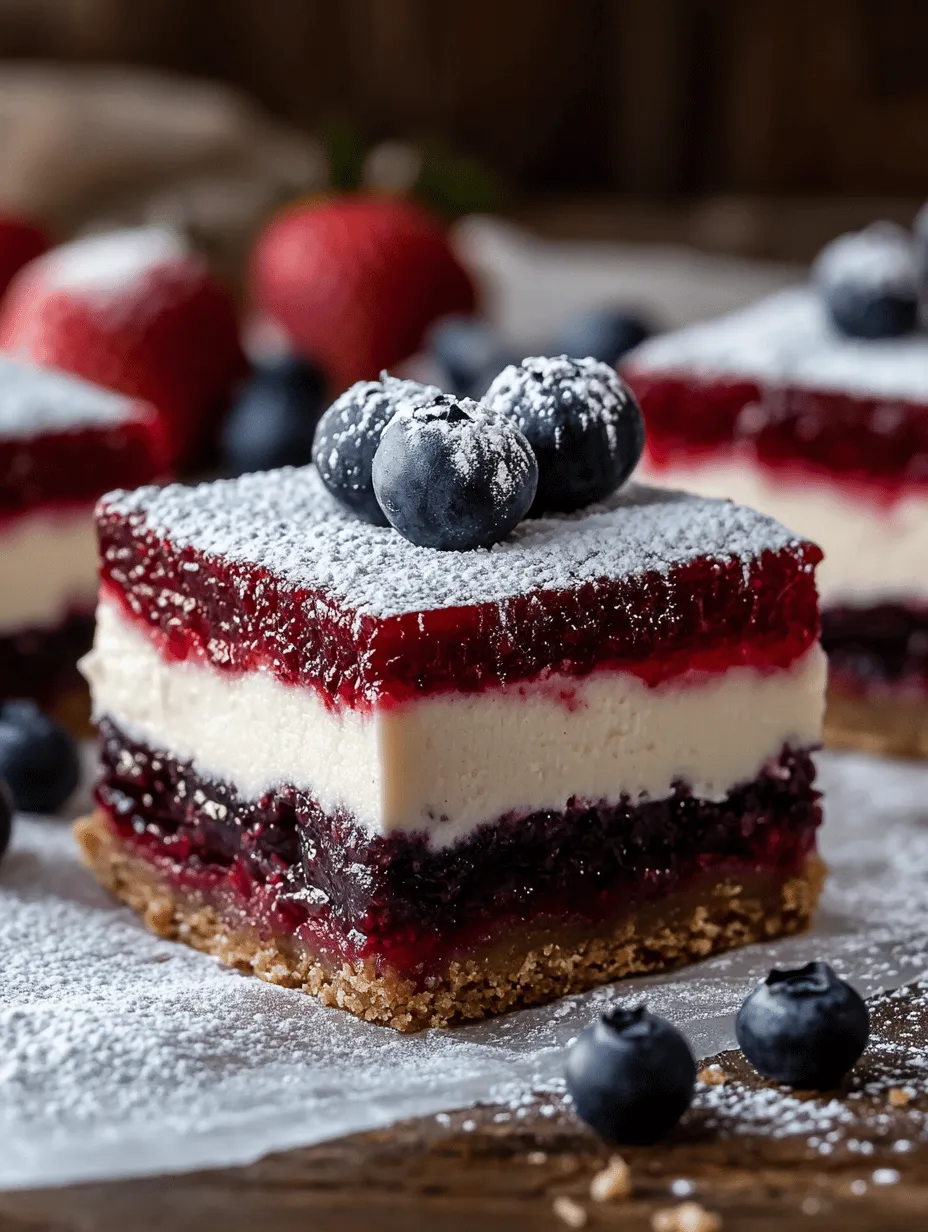
Star-Spangled Cheesecake Bars
Overview of the Dessert’s Appeal
The Star-Spangled Cheesecake Bars are a delightful combination of rich, creamy cheesecake and a vibrant, marbled red and blue topping that embodies the spirit of Independence Day. These bars are not only visually striking but also incredibly easy to make, making them a perfect choice for both novice and experienced bakers. The creamy texture of the cheesecake, paired with the fruity flavors from the red and blue layers, creates a delicious contrast that will have everyone coming back for seconds.
Ingredients List with Measurements
To create these delectable cheesecake bars, you will need the following ingredients:
For the crust:
– 1 ½ cups graham cracker crumbs
– ½ cup granulated sugar
– ½ cup unsalted butter, melted
For the cheesecake filling:
– 2 (8 oz) packages of cream cheese, softened
– 1 cup granulated sugar
– 2 large eggs
– 1 teaspoon vanilla extract
– ½ cup sour cream
For the red layer:
– 1 cup strawberries, pureed (fresh or frozen)
– 2 tablespoons sugar
– 1 tablespoon lemon juice
For the blue layer:
– 1 cup blueberries, pureed (fresh or frozen)
– 2 tablespoons sugar
– 1 tablespoon lemon juice
Step-by-Step Instructions for Preparation
Step 1: Prepare the Crust
1. Preheat your oven to 325°F (163°C).
2. In a medium mixing bowl, combine the graham cracker crumbs and granulated sugar.
3. Pour in the melted butter and mix until the crumbs are evenly coated and resemble wet sand.
4. Press the crumb mixture firmly into the bottom of a greased 9×13-inch baking dish to form an even layer.
5. Bake the crust in the preheated oven for 8-10 minutes, or until lightly golden. Remove from the oven and let it cool.
Step 2: Make the Cheesecake Filling
1. In a large mixing bowl, beat the softened cream cheese with an electric mixer until smooth and creamy.
2. Gradually add the granulated sugar and continue to beat until fully combined.
3. Add the eggs one at a time, ensuring that each is fully incorporated before adding the next.
4. Mix in the vanilla extract and sour cream until the mixture is smooth and creamy.
5. Pour the cheesecake filling over the cooled crust, spreading it evenly.
Step 3: Create the Red and Blue Layers
1. In a small saucepan, combine the strawberry puree, sugar, and lemon juice over medium heat. Cook until the mixture thickens slightly, about 5-7 minutes. Remove from heat and let it cool.
2. Repeat the process for the blueberry layer using the blueberry puree, sugar, and lemon juice.
3. Drop spoonfuls of the cooled strawberry mixture on top of the cheesecake filling, followed by spoonfuls of the blueberry mixture.
4. Use a butter knife or a skewer to gently swirl the red and blue mixtures into the cheesecake filling, creating a marbled effect.
Step 4: Bake the Bars
1. Place the baking dish in the oven and bake for 35-40 minutes, or until the center is set but still slightly jiggly.
2. Turn off the oven and crack the oven door, allowing the cheesecake to cool gradually for about 1 hour.
3. Remove the cheesecake bars from the oven and let them cool to room temperature before refrigerating for at least 4 hours, or overnight for best results.
Tips for Achieving the Perfect Marbled Effect
– To create a stunning marbled appearance, do not overmix the red and blue layers. Lightly swirl them with a gentle hand to maintain distinct colors while blending them into the cheesecake.
– Use fresh berries when possible for the purees, as they will provide a more vibrant color and fresh flavor.
– For an extra touch of elegance, consider topping the bars with fresh berries or whipped cream before serving.
Serving Suggestions and Presentation Ideas
When ready to serve, cut the cheesecake into bars and arrange them on a festive platter. For added flair, garnish each bar with a dollop of whipped cream and a few fresh strawberries or blueberries. You can also dust the top with powdered sugar for a beautiful finish. Display the bars alongside other red, white, and blue desserts to create a stunning dessert table that will captivate your guests.
Stay tuned for more delicious red, white, and blue dessert recipes that will make your summer celebrations even sweeter!
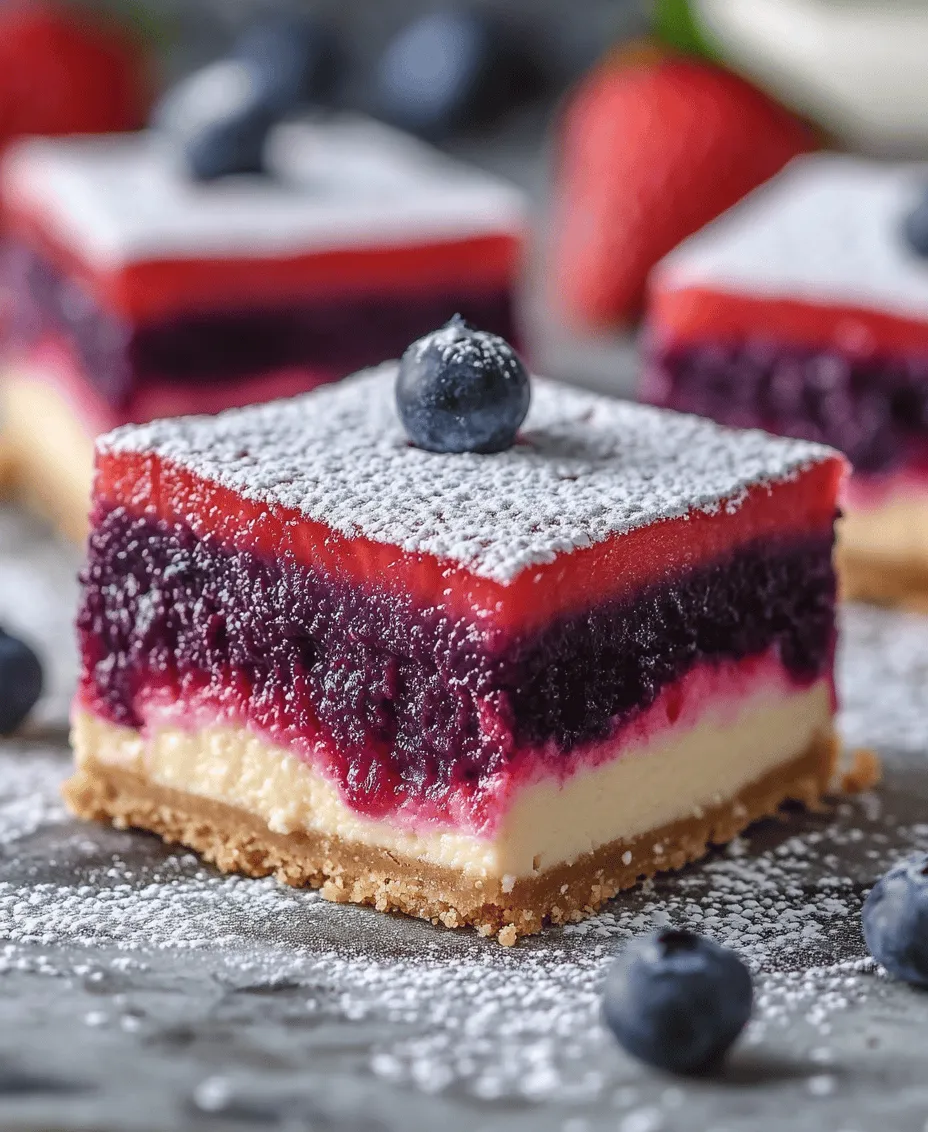
Star-Spangled Cheesecake Bars
Ingredients for the Mousse Layers
To create the luscious mousse layers for your Star-Spangled Cheesecake Bars, you will need the following ingredients:
– For the Red Layer:
– 1 cup fresh strawberries (or strawberry puree)
– 1 cup heavy whipping cream
– 1/2 cup powdered sugar
– 1 teaspoon vanilla extract
– 1 package (8 oz) cream cheese, softened
– For the White Layer:
– 1 cup heavy whipping cream
– 1/2 cup powdered sugar
– 1 teaspoon vanilla extract
– 1 package (8 oz) cream cheese, softened
– For the Blue Layer:
– 1 cup blueberries (or blueberry puree)
– 1 cup heavy whipping cream
– 1/2 cup powdered sugar
– 1 teaspoon vanilla extract
– 1 package (8 oz) cream cheese, softened
Step-by-Step Instructions for Preparation
1. Prepare the Crust: Start by making the crust. In a medium bowl, combine 1 1/2 cups of crushed graham crackers, 1/2 cup of melted butter, and 1/4 cup of sugar. Press the mixture firmly into the bottom of a 9×9-inch baking dish. Bake at 350°F (175°C) for 10 minutes and let it cool.
2. Make the Red Layer: In a blender, blend the strawberries until smooth. In a large bowl, beat the softened cream cheese until creamy. Add the strawberry puree, powdered sugar, and vanilla extract. In a separate bowl, whip 1 cup of heavy cream until stiff peaks form, then gently fold it into the strawberry mixture. Pour this red layer over the cooled crust, spreading it evenly. Chill in the refrigerator for 30 minutes.
3. Make the White Layer: In a similar fashion, beat the cream cheese in a bowl, then add the powdered sugar and vanilla extract. In another bowl, whip the heavy cream until stiff peaks form. Fold this whipped cream into the cream cheese mixture and spread it over the chilled red layer. Refrigerate for another 30 minutes.
4. Make the Blue Layer: Blend the blueberries until smooth. Follow the same procedure as the previous layers: beat the cream cheese, mix in the blueberry puree, and fold in the whipped cream. Spread this final layer over the white layer and chill for at least 4 hours or until set.
5. Serve: Once fully chilled, cut into squares and serve with fresh berries on top for decoration.
Tips for Serving in Elegant Cups
– For an elegant presentation, consider serving these cheesecake bars in individual cups. Layer the red, white, and blue mousse carefully in clear dessert cups to showcase the vibrant colors.
– Garnish with a dollop of whipped cream and a sprinkle of fresh berries for an appealing touch.
– You can also drizzle some chocolate or berry sauce on top for added flavor and decoration.
Red, White, and Blue Ice Cream Sundaes
Overview of the Simplicity of This Dessert
Ice cream sundaes are a classic dessert that everyone loves, making them perfect for any celebration. The simplicity and versatility of this dessert allow for endless customization, making it easy to incorporate the patriotic colors of red, white, and blue.
Ingredients for Creating the Sundae
To create your delightful sundae, gather the following ingredients:
– Vanilla ice cream (or any flavor you prefer)
– Fresh strawberries, sliced
– Fresh blueberries
– Whipped cream
– Red, white, and blue sprinkles
– Maraschino cherries for garnish
– Chocolate or berry sauce (optional)
Instructions for Layering and Garnishing
1. Scoop the Ice Cream: Start by scooping two generous scoops of vanilla ice cream into a tall glass or sundae dish.
2. Layer the Berries: Top the ice cream with a layer of sliced strawberries followed by a layer of blueberries. This creates a vibrant red and blue contrast.
3. Add Whipped Cream: Generously dollop whipped cream over the berries, allowing it to cascade down the sides.
4. Garnish: Finish off your sundae with a sprinkle of red, white, and blue sprinkles and a maraschino cherry on top. For an extra touch, drizzle chocolate or berry sauce over the whipped cream.
Ideas for Customizing Flavors with Different Ice Creams
– Consider using strawberry, blueberry, or even coconut-flavored ice cream for added color and flavor.
– You can mix and match flavors with layers of chocolate ice cream or any other favorite to surprise your guests.
Patriotic Cake Pops
Explanation of the Fun, Bite-Sized Treat
Cake pops are a fun and delightful treat that’s perfect for any gathering. They are portable, easy to eat, and can be decorated to fit any theme, making them a hit at summer celebrations.
Ingredients and Instructions for Preparation
To make these patriotic cake pops, you will need:
– 1 box vanilla cake mix (plus ingredients required to prepare)
– 1 cup frosting (store-bought or homemade)
– Red, white, and blue candy melts
– Lollipop sticks
– Sprinkles for decoration
Instructions:
1. Bake the Cake: Prepare the vanilla cake mix according to package instructions and bake in a 9×13 inch pan. Allow it to cool completely.
2. Crumble the Cake: Once cooled, crumble the cake into a large bowl. Add frosting gradually until the mixture sticks together but is not overly moist.
3. Form Balls: Roll the mixture into 1-inch balls and place them on a baking sheet lined with parchment paper. Insert lollipop sticks into each ball and refrigerate for about 30 minutes until firm.
4. Melt the Candy Coating: Melt the red, white, and blue candy melts in separate bowls according to package instructions.
5. Dip the Cake Pops: Dip each cake pop into the melted candy coating, allowing excess to drip off. Immediately sprinkle with decorations while the coating is still wet.
6. Set the Cake Pops: Stand the cake pops upright in a foam block or a cake pop stand to set completely.
Tips for Decorating with Sprinkles
– Use a mix of different sprinkle shapes and sizes to create visual interest and texture.
– You can also drizzle contrasting colors of melted candy over the coated pops for a decorative touch.
Serving Ideas for Parties
– Display the cake pops in decorative jars or on cake stands for an eye-catching centerpiece.
– Consider serving them on a platter with other treats for a complete dessert table.
Red and Blue Berry Galette
Description of the Rustic Dessert
A galette is a rustic, free-form tart that is both beautiful and delicious. This red and blue berry galette is packed with fresh flavors and is perfect for showcasing seasonal berries.
Ingredients and Preparation Instructions
To make the galette, gather these ingredients:
– 1 pre-made pie crust (or homemade)
– 1 cup fresh strawberries, halved
– 1 cup fresh blueberries
– 1/3 cup sugar
– 2 tablespoons cornstarch
– 1 teaspoon vanilla extract
– 1 egg, beaten (for egg wash)
– Extra sugar for sprinkling
Instructions:
1. Preheat the Oven: Preheat your oven to 375°F (190°C).
2. Prepare the Filling: In a bowl, combine the strawberries, blueberries, sugar, cornstarch, and vanilla extract. Stir until well mixed.
3. Roll Out the Dough: On a floured surface, roll out the pie crust into a 12-inch circle. Transfer to a baking sheet lined with parchment paper.
4. Assemble the Galette: Spoon the berry mixture into the center of the dough, leaving a 2-inch border. Fold the edges of the dough over the filling, pleating as you go.
5. Add Egg Wash: Brush the crust with the beaten egg and sprinkle sugar on top for added sweetness and shine.
6. Bake: Bake for 35-40 minutes, or until the crust is golden brown and the filling is bubbly. Let cool before serving.
Tips for Achieving a Flaky Crust
– Ensure your butter is cold when making the dough; this helps create a flaky texture.
– Avoid overworking the dough to keep it tender.
Serving Suggestions and Flavor Pairings
– Serve the galette warm with a scoop of vanilla ice cream for a delightful contrast.
– Pair with fresh mint leaves or a drizzle of honey for an added flavor dimension.
Red, White, and Blue Smoothie Bowl
Benefits of a Healthy Dessert Option
Smoothie bowls are not only delicious but also a nutritious dessert option. Packed with vitamins and minerals, they can be a refreshing choice for summer gatherings.
Ingredients for the Smoothie Base and Toppings
To create your smoothie bowl, you’ll need:
– For the base:
– 1 banana, frozen
– 1 cup frozen strawberries
– 1/2 cup almond milk (or any milk of choice)
– For the toppings:
– Fresh blueberries
– Sliced strawberries
– Granola
– Chia seeds
– Coconut flakes
Step-by-Step Blending and Layering Instructions
1. Blend the Base: In a blender, combine the frozen banana, strawberries, and almond milk. Blend until smooth and creamy.
2. Pour and Layer: Pour the smoothie into a bowl, creating a thick base.
3. Add Toppings: Arrange fresh blueberries, sliced strawberries, granola, chia seeds, and coconut flakes on top in a decorative manner.
Ideas for Unique Toppings
– Incorporate nuts, seeds, or other fruits like kiwi or mango for a pop of color and additional nutrients.
– Drizzle honey or maple syrup for added sweetness.
Red, White, and Blue Biscotti
Overview of the Crunchy Treat
Biscotti are Italian cookies that are twice-baked, making them crunchy and perfect for dipping in coffee or tea. This red, white, and blue version adds a festive touch and a delightful flavor.
Ingredients and Preparation Steps
To make the biscotti, gather:
– 2 cups all-purpose flour
– 1 cup sugar
– 1 teaspoon baking powder
– 1/2 teaspoon salt
– 3 large eggs
– 1 teaspoon vanilla extract
– 1/2 cup dried cranberries
– 1/2 cup dried blueberries
– White chocolate chips (optional)
Instructions:
1. Preheat the Oven: Preheat your oven to 350°F (175°C). Line a baking sheet with parchment paper.
2. Mix Dry Ingredients: In a large bowl, whisk together the flour, sugar, baking powder, and salt.
3. Combine Wet Ingredients: In another bowl, beat the eggs and vanilla extract. Pour the wet ingredients into the dry ingredients and mix until combined. Fold in the cranberries and blueberries.
4. Shape the Dough: Divide the dough in half and shape each half into a log about 12 inches long. Place the logs on the prepared baking sheet.
5. First Bake: Bake for 25-30 minutes until golden. Let cool for 10 minutes.
6. Slice and Second Bake: Slice the logs diagonally into 1/2-inch thick pieces. Lay them cut side down on the baking sheet and bake for an additional 10-15 minutes until crisp.
Detailed Instructions for Baking and Slicing
– Ensure the dough is not too sticky; if necessary, add a bit more flour to achieve a workable consistency.
– Use a serrated knife for slicing to get clean cuts.
Suggestions for Pairing with Beverages
– Biscotti are perfect when paired with coffee, tea, or a glass of milk for a delightful treat.
– Consider serving with a fruity herbal tea that complements the berry flavors.
Patriotic Berry Frittata
Introduction to a Unique Breakfast Dessert
A frittata is a versatile dish that can be enjoyed at any meal, but this berry frittata serves as a unique breakfast dessert, showcasing fresh summer berries.
Ingredients for the Frittata and Preparation Instructions
Gather these ingredients for your frittata:
– 6 large eggs
– 1 cup milk
– 1 cup fresh strawberries, sliced
– 1 cup fresh blueberries
– 1/2 cup shredded cheese (optional)
– Salt and pepper to taste
– Fresh herbs for garnish (such as mint or basil)
Instructions:
1. Preheat the Oven: Preheat your oven to 375°F (190°C).
2. Whisk Eggs and Milk: In a large bowl, whisk together the eggs and milk until well combined. Season with salt and pepper.
3. Add the Berries: Gently fold in the sliced strawberries and blueberries, ensuring an even distribution.
4. Pour into a Baking Dish: Pour the egg mixture into a greased oven-safe skillet or baking dish. Sprinkle with cheese if using.
5. Bake: Bake for 25-30 minutes or until the eggs are set and the top is golden.
Tips for Achieving the Perfect Bake
– Keep an eye on the frittata to prevent overbaking; it should be just set but still moist.
– Let it cool slightly before slicing to maintain its shape.
Serving Suggestions with Fresh Herbs
– Garnish with fresh herbs to add a pop of color and flavor.
– Serve with a side of yogurt or a light salad for a refreshing breakfast or brunch.
Red and Blue Jello Cups
Description of the Nostalgic Dessert
Jello cups are a nostalgic dessert that brings back memories of childhood. This vibrant, layered version is perfect for summer gatherings and offers a fun way to enjoy a classic treat.
Ingredients and Preparation Steps for the Jello Layers
To create these colorful jello cups, you will need:
– 1 box cherry jello
– 1 box blueberry jello
– 1 cup boiling water for each jello flavor
– 1 cup cold water for each jello flavor
– Whipped cream for topping
– Fresh berries for garnish
Instructions