
Introduction
Butterscotch pudding is a beloved classic dessert that evokes feelings of comfort and nostalgia. This creamy confection, with its rich flavor and velvety texture, has been a staple in homes for generations. Many of us can recall fond memories of sitting at the kitchen table, spoonfuls of this delightful pudding in hand, savoring the sweet, buttery goodness that is hard to resist. Whether served warm or chilled, butterscotch pudding provides a sense of warmth and indulgence, making it a perfect treat for any occasion, from family gatherings to quiet evenings at home.
The beauty of this heavenly butterscotch pudding recipe lies in its simplicity. Using just a handful of ingredients, you can create a dessert that not only satisfies your sweet tooth but also impresses your family and friends. With an easy-to-follow method, you’ll find that making this classic dessert from scratch is not only rewarding but also a delightful way to connect with the art of cooking.
In this article, we will explore the flavor profile of butterscotch, unravel the history of this cherished treat, and guide you through the essential ingredients that make this pudding truly special. So, let’s dive into the world of butterscotch and discover how to create this decadent dessert in your own kitchen.
Understanding Butterscotch: A Flavor Profile
Butterscotch is a unique and delightful flavor that has captivated dessert lovers for centuries. At its core, butterscotch is a combination of brown sugar and butter, which creates a rich, sweet, and slightly caramelized taste. The distinctive flavor profile comes from the process of cooking the brown sugar and butter together, which allows the sugars to melt and develop into a syrupy consistency. This combination is not only delicious but also versatile; it can be used in various desserts, candies, and sauces.
Historically, butterscotch can be traced back to the 19th century in England, where it was originally made as a hard candy. Over the years, its use evolved, and it became popularized in puddings, cakes, and other sweet treats. The warm, comforting flavor of butterscotch has since become synonymous with home-cooked desserts, reminding many of cherished family recipes passed down through generations.
One of the key components that contribute to the distinct taste of butterscotch pudding is brown sugar. Unlike granulated white sugar, brown sugar contains molasses, which imparts a deep, caramel-like flavor and moisture to the pudding. The unique combination of sweet and buttery flavors creates a rich and satisfying dessert that is sure to please any crowd.
Ingredients Breakdown
To create the perfect heavenly butterscotch pudding, it’s essential to understand the role of each ingredient in the recipe. Here’s a detailed breakdown of the ingredients you’ll need:
Brown Sugar
Brown sugar is the star of this recipe, providing the characteristic sweetness and flavor that defines butterscotch. When measuring brown sugar, it’s crucial to pack it into the measuring cup. This ensures you’re using the correct amount; if not packed, you might end up with less sugar than needed, resulting in a less sweet pudding. The molasses in brown sugar not only enhances the flavor but also contributes to the pudding’s rich caramel color.
Cornstarch
Cornstarch is the key thickening agent in this recipe. When combined with liquid and heated, it creates a smooth, thick texture that gives the pudding its creamy consistency. If you don’t have cornstarch on hand, you can substitute it with an equal amount of all-purpose flour, although this may slightly alter the texture. Cornstarch is preferred for its ability to create a silky finish without imparting additional flavors.
Whole Milk
Using whole milk is essential for achieving a creamy and luxurious pudding. The higher fat content in whole milk contributes to a richer mouthfeel and adds depth to the final product. If you prefer a lighter version, you could substitute with 2% milk, but the pudding may not be as rich and satisfying. For a dairy-free option, consider using a full-fat coconut milk or almond milk, though this will change the flavor profile slightly.
Egg Yolks
Egg yolks are a crucial ingredient in butterscotch pudding, providing both richness and a velvety texture. They help emulsify the mixture, bringing together the sugar, milk, and butter while adding a depth of flavor. Be sure to separate the yolks carefully, as any egg white can affect the consistency of your pudding. If you prefer a vegan version, you can try using a commercial egg replacer, but the texture may vary.
Unsalted Butter
Unsalted butter is used to enhance the overall flavor of the pudding. It adds a creamy richness that complements the sweetness of the brown sugar. Using unsalted butter allows you to control the amount of salt in the recipe, ensuring that the flavors remain balanced. If you only have salted butter on hand, you can use that but consider reducing the amount of added salt in the recipe.
Vanilla Extract
Vanilla extract is a crucial ingredient in many dessert recipes, including butterscotch pudding. The use of pure vanilla extract contributes a warm, inviting flavor that elevates the butterscotch without overpowering it. While imitation vanilla extract is a more affordable option, it lacks the depth and complexity of pure extract. For a unique twist, consider adding a hint of sea salt or almond extract to complement the butterscotch flavor.
Optional Toppings
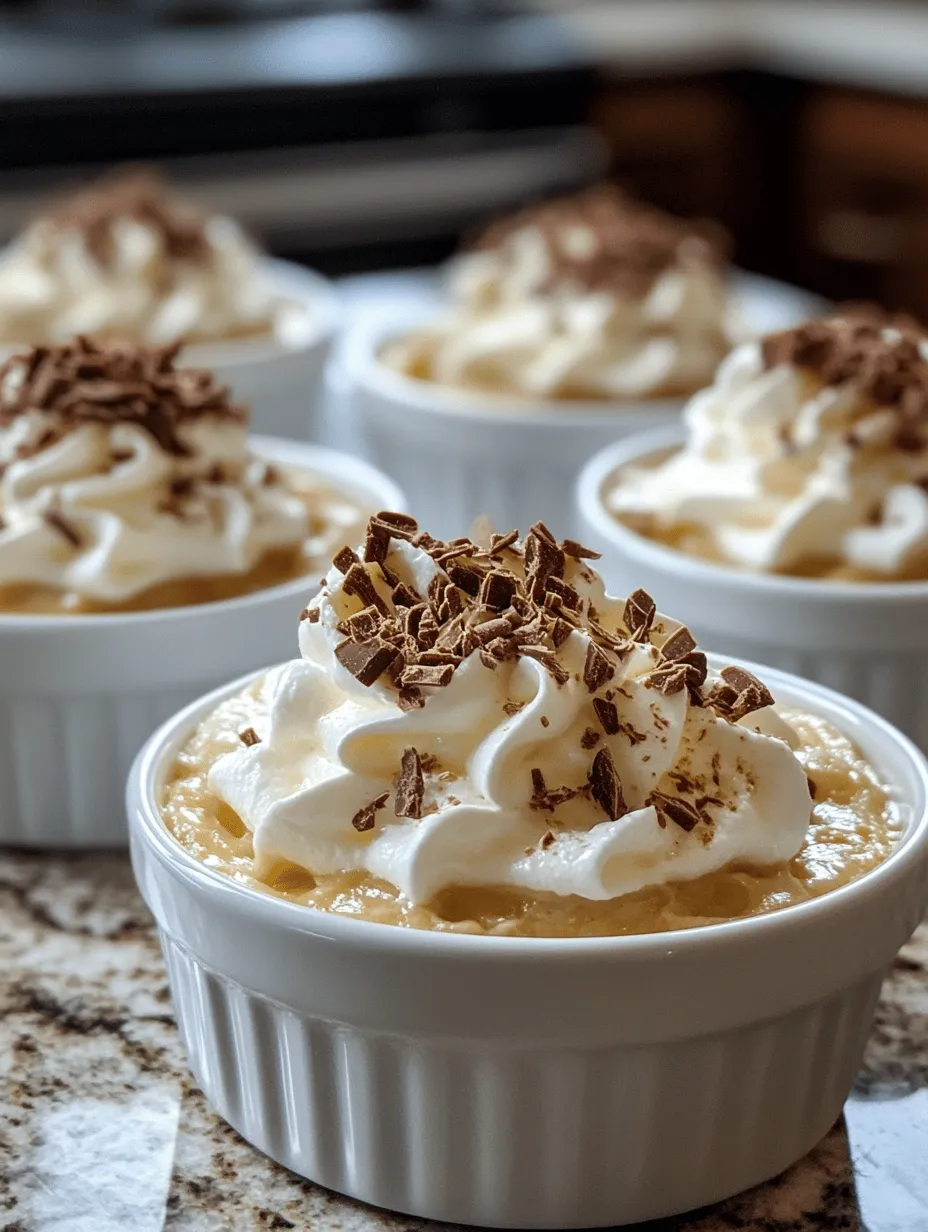
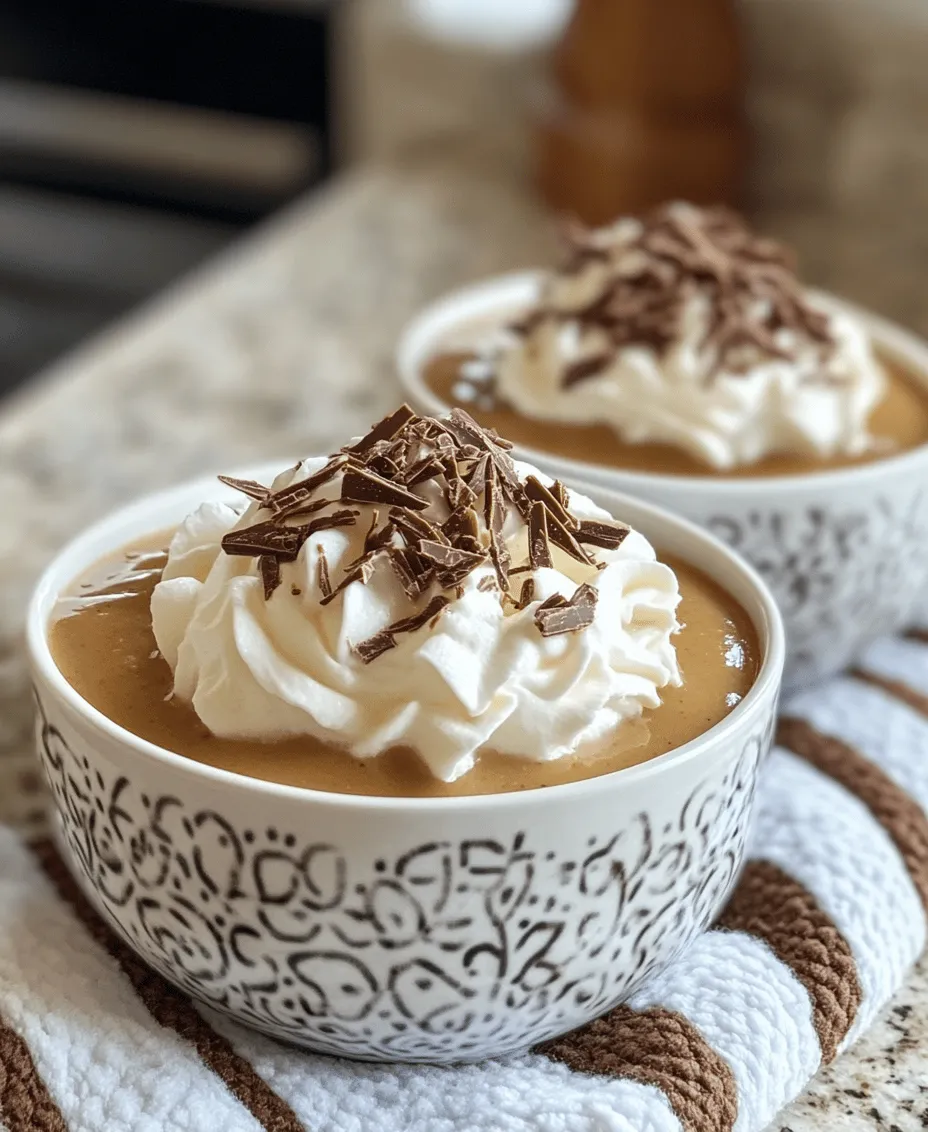
To enhance the presentation and flavor of your butterscotch pudding, consider adding optional toppings. Whipped cream is a classic choice, providing a light and airy contrast to the richness of the pudding. You can also sprinkle some crushed toffee or butterscotch chips on top for added texture and sweetness. For those who enjoy a touch of elegance, consider garnishing with shaved chocolate or a drizzle of caramel sauce.
Step-by-Step Instructions
Now that you are familiar with the ingredients and their roles in the recipe, let’s move on to the step-by-step instructions for creating your heavenly butterscotch pudding. This easy-to-follow guide will ensure your pudding turns out perfectly every time.
1. Gather Your Ingredients: Before you begin, make sure all your ingredients are measured and ready to go. This will streamline the cooking process and help you avoid any last-minute scrambling.
2. Combine the Dry Ingredients: In a medium saucepan, whisk together the packed brown sugar, cornstarch, and a pinch of salt. This step is crucial as it ensures that the cornstarch is evenly distributed, preventing clumps from forming in your pudding.
3. Incorporate the Milk: Gradually whisk in the whole milk, ensuring that you dissolve the dry ingredients completely. This mixture should be smooth and free of lumps. Place the saucepan over medium heat and continue to stir.
4. Heat the Mixture: As you heat the mixture, it will start to thicken. Keep stirring constantly to prevent the pudding from sticking to the bottom of the pan and to ensure even cooking. This process may take about 5-10 minutes.
5. Prepare the Egg Yolks: While the pudding thickens, separate the egg yolks from the whites. Place the yolks in a small bowl and whisk them together until they are slightly frothy. This will help temper the yolks in the next step.
6. Temper the Egg Yolks: Once the pudding has thickened, remove it from the heat. To prevent the yolks from scrambling, you need to temper them. Slowly pour about a cup of the hot pudding mixture into the bowl with the egg yolks, whisking constantly. This step gradually raises the temperature of the yolks.
7. Combine the Mixtures: After tempering the yolks, pour the yolk mixture back into the saucepan with the remaining pudding. Return the saucepan to medium heat and cook for an additional 2-3 minutes, stirring continuously until the pudding is thick and creamy.
8. Add the Butter and Vanilla: Remove the saucepan from the heat once the pudding has reached your desired thickness. Stir in the unsalted butter and pure vanilla extract until the butter is fully melted and incorporated.
9. Cool the Pudding: Allow the pudding to cool slightly before transferring it to individual serving dishes or a large bowl. Cover the surface with plastic wrap to prevent a skin from forming. Refrigerate for at least 2 hours to allow the pudding to set completely.
As you prepare to serve your heavenly butterscotch pudding, consider the optional toppings to add a finishing touch. Whether you choose whipped cream, toffee bits, or a drizzle of caramel, these enhancements will elevate your dessert to new heights. Enjoy every delicious spoonful of this classic treat that brings both comfort and joy to your table.
In the next section, we will delve deeper into tips for achieving the best results with your butterscotch pudding, ensuring that it is as delightful as possible. Stay tuned for expert advice and common questions that may arise as you embark on this culinary adventure!
Heavenly Butterscotch Pudding: A Step-by-Step Guide to Making Perfect Pudding
When it comes to desserts that evoke feelings of nostalgia and comfort, few can compete with a luscious homemade butterscotch pudding. This delightful treat combines the rich flavors of brown sugar and butter with a velvety texture that melts in your mouth. In this section, we will delve into the essential steps to create your own heavenly butterscotch pudding, along with serving suggestions, nutritional information, and a final recap of why this dessert is a timeless favorite.
Step-by-Step Breakdown of the Pudding-Making Process
1. Combining Dry Ingredients: The Importance of Thorough Mixing
Start by gathering your dry ingredients: brown sugar, cornstarch, salt, and a touch of vanilla bean powder if desired. In a medium-sized bowl, thoroughly mix these ingredients using a whisk. This step is crucial as it ensures that the cornstarch and sugar distribute evenly, preventing lumps during the cooking process. A well-blended dry mix will yield a smooth and silky pudding, making this initial step critical for your dessert’s success.
2. Gradual Addition of Milk: Tips to Avoid Lumps
Next, begin to incorporate the milk gradually into your dry mixture. Use a whisk as you pour in the milk slowly, about a quarter cup at a time. This method allows the dry ingredients to absorb the liquid without forming lumps. Whisk continuously to ensure a uniform blend, which is key to achieving that sought-after smooth texture. Once all the milk is added, set the mixture aside and prepare to heat it.
3. Heating the Mixture: Signs to Look for When it Thickens
Pour the milk and dry ingredient mixture into a medium saucepan over medium heat. Stir frequently as the mixture heats up. Keep an eye on it; you’ll notice it starts to steam and bubble around the edges. This is a sign that it’s beginning to thicken. As it cooks, continue to stir, ensuring that the mixture doesn’t stick to the bottom of the pan. After about 5 to 7 minutes, you should see significant thickening, resembling a custard-like consistency.
4. Incorporating Egg Yolks: The Tempering Process Explained
In a separate bowl, whisk your egg yolks until they are light and frothy. To incorporate them without scrambling, you will need to temper the yolks. Slowly ladle a few tablespoons of the hot pudding mixture into the yolks while whisking vigorously. This gradual increase in temperature will prepare the yolks for the heat without cooking them. Once tempered, pour the yolk mixture back into the saucepan, stirring continuously. This process enriches the pudding and adds depth to the flavor.
5. Final Cooking Phase: Achieving the Perfect Consistency
Continue to cook the mixture over medium heat, stirring constantly. The pudding will thicken further, and it’s essential to keep stirring to prevent any lumps from forming. Cook for an additional 2 to 3 minutes until it reaches a pudding-like consistency. Remove the saucepan from the heat. At this point, you should have a beautiful, creamy mixture that is ready for the final touches.
6. Adding Flavor Enhancers: How Butter and Vanilla Contribute to the Final Product
Once you have achieved the desired thickness, it’s time to enhance the pudding’s flavor. Add in the butter and pure vanilla extract, stirring until the butter has completely melted and combined. This addition not only boosts the flavor profile but also contributes to the pudding’s silky texture. If using vanilla bean, scrape out the seeds and stir them in for added visual appeal and taste.
7. Chilling the Pudding: Importance of Cooling for Texture and Flavor Development
Transfer the pudding to individual serving dishes or a large bowl. To prevent a skin from forming on the surface, press a piece of plastic wrap directly onto the pudding. Refrigerate for at least 2 hours, or until it is fully chilled. This resting period is crucial, as it allows the flavors to meld and the pudding to set to the perfect consistency.
Serving Suggestions
Once your butterscotch pudding is chilled and ready to enjoy, it’s time to think about presentation and pairing options.
Presentation Ideas for Serving Butterscotch Pudding
– Classic: Serve the pudding in small ramekins or dessert cups. Top with a dollop of freshly whipped cream and a sprinkle of crushed toffee or butterscotch chips for an elegant touch.
– Layered Parfait: Create a layered dessert by alternating layers of butterscotch pudding with crushed cookies, such as graham crackers or gingersnaps, and whipped cream.
– Garnish: For added flair, consider garnishing with chocolate shavings or a drizzle of caramel sauce.
Pairing Options: What to Serve Alongside the Pudding for a Complete Dessert Experience
– Coffee or Tea: A warm cup of coffee or a soothing herbal tea pairs beautifully with the rich flavors of butterscotch pudding, enhancing the overall dessert experience.
– Fruit Compote: A tart fruit compote, such as raspberry or cherry, can contrast nicely with the sweetness of the pudding, adding a fresh element to your dessert.
– Cookies or Biscotti: Serve alongside buttery shortbread cookies or crunchy biscotti for added texture and flavor.
Creative Variations: Suggestions for Altering the Recipe for Different Flavor Profiles
– Chocolate Butterscotch Pudding: Incorporate cocoa powder or melted dark chocolate into the pudding mixture for a delectable twist.
– Nutty Flavor: Add a tablespoon of almond or hazelnut extract to the pudding for a nutty undertone that complements the butterscotch flavor.
– Spiced Pudding: For a warm, spicy note, consider adding a pinch of cinnamon or nutmeg to the dry ingredients before cooking.
Nutritional Information
When indulging in butterscotch pudding, it’s helpful to understand its nutritional aspects, especially if you are mindful of your dietary needs.
Overview of Nutritional Aspects of the Butterscotch Pudding
Each serving of butterscotch pudding provides a delightful balance of flavors and textures, but it also contains sugar and fats. If you are counting calories or managing your sugar intake, here’s a brief overview:
– Calories: Approximately 250-300 calories per serving, depending on portion size and added toppings.
– Sugars: Around 20-25 grams of sugar per serving, primarily from brown sugar and any additional toppings.
– Fats: Roughly 10-15 grams of fat, primarily coming from butter and egg yolks.
Considerations for Dietary Restrictions
For those with dietary restrictions, the pudding can be adapted easily:
– Lactose Intolerance: Substitute regular milk with lactose-free milk or almond milk. Ensure that the butter is replaced with a dairy-free alternative for a fully lactose-free dessert.
– Egg-Free Option: Consider using a commercial egg replacer or silken tofu blended for a vegan version of butterscotch pudding.
Conclusion
Homemade butterscotch pudding is not only a delightful dessert but also a journey back to simpler times, where the joys of cooking and sharing food brought people together. The creamy texture and rich flavor make it a beloved treat across generations. As you experiment with this recipe, don’t hesitate to make it your own by incorporating unique flavors or presentation styles.
Whether you choose to savor it on a quiet evening, serve it at a gathering, or gift it to a friend, butterscotch pudding will always hold a special place in the hearts of dessert lovers. Embrace the timeless appeal of this classic dessert in your kitchen, and enjoy every spoonful of your homemade creation.