As the sun shines brighter and the days grow longer, the allure of summer gatherings becomes irresistible. Whether it’s a backyard barbecue, a family reunion, or a simple afternoon get-together with friends, having the perfect dessert can elevate any occasion. Enter the Summer Berry Peach Cheesecake—a luscious dessert that encapsulates the essence of summer with its vibrant flavors and creamy texture.
This cheesecake is not just a treat for the taste buds; it celebrates the season’s bounty with a delightful combination of fresh peaches and mixed berries. The sweet, juicy peaches pair beautifully with the tartness of berries, creating a flavor profile that dances on the palate. The creamy cheesecake filling, nestled between a buttery graham cracker crust and a fresh berry topping, makes this dessert a standout choice for any summer celebration.
Cheesecake itself is a beloved classic, known for its versatility. It can be customized with various seasonal fruits, making it a canvas for creativity in the kitchen. This Summer Berry Peach Cheesecake offers an opportunity to showcase the best of summer fruits, ensuring that each bite is a burst of seasonal goodness.
Understanding the Ingredients
To create a truly exceptional Summer Berry Peach Cheesecake, it is crucial to use fresh, high-quality ingredients. The flavors of this dessert hinge on the freshness of the fruits and the quality of the dairy products. Here’s a closer look at the key components of this delightful recipe:
Graham Cracker Crust
The foundation of any great cheesecake is its crust, and for this recipe, a graham cracker crust is the perfect choice. The graham cracker crumbs provide a subtle sweetness and a delightful crunch that contrasts beautifully with the creamy filling. When made correctly, the crust not only adds flavor but also serves as a sturdy base that holds the cheesecake together when sliced.
For optimal results, ensure that you crush the graham crackers finely, as larger pieces can lead to a crumbly texture. Mixing the crumbs with melted butter allows them to bind together, creating a crust that is both firm and flavorful.
Cheesecake Filling
The heart of the Summer Berry Peach Cheesecake is undoubtedly its rich and creamy filling. The primary ingredient here is cream cheese, which provides the signature smoothness and richness that cheesecakes are known for. It’s essential to allow the cream cheese to soften to room temperature before mixing; this step is crucial for achieving a lump-free mixture.
In addition to cream cheese, this filling typically includes eggs and heavy cream. The eggs help provide structure and stability, while the heavy cream adds an extra level of richness, creating a velvety texture. The combination of these ingredients results in a cheesecake that is both indulgent and satisfying, making it a perfect dessert for summer gatherings.
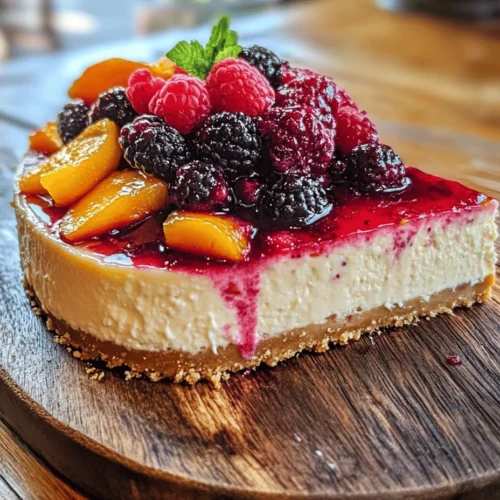
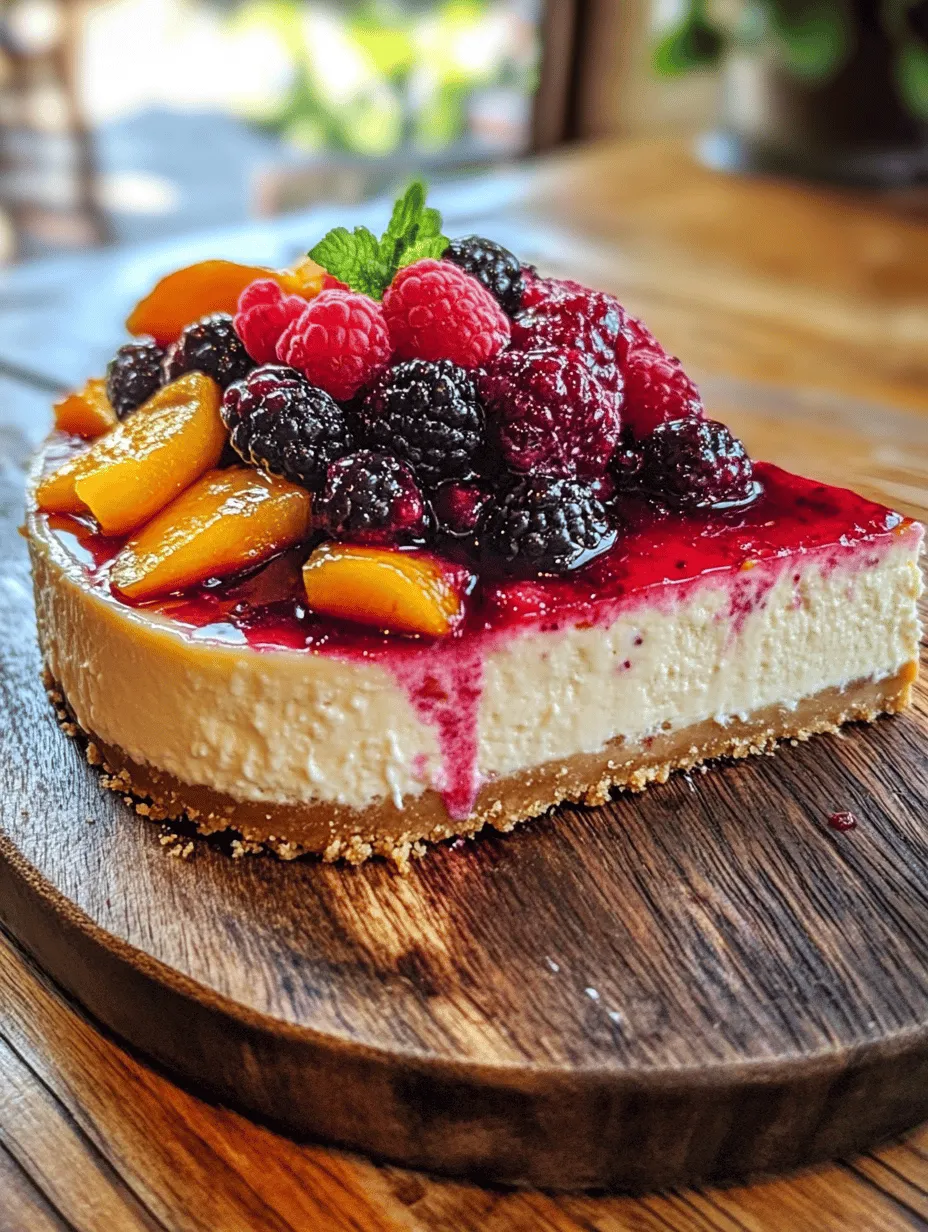
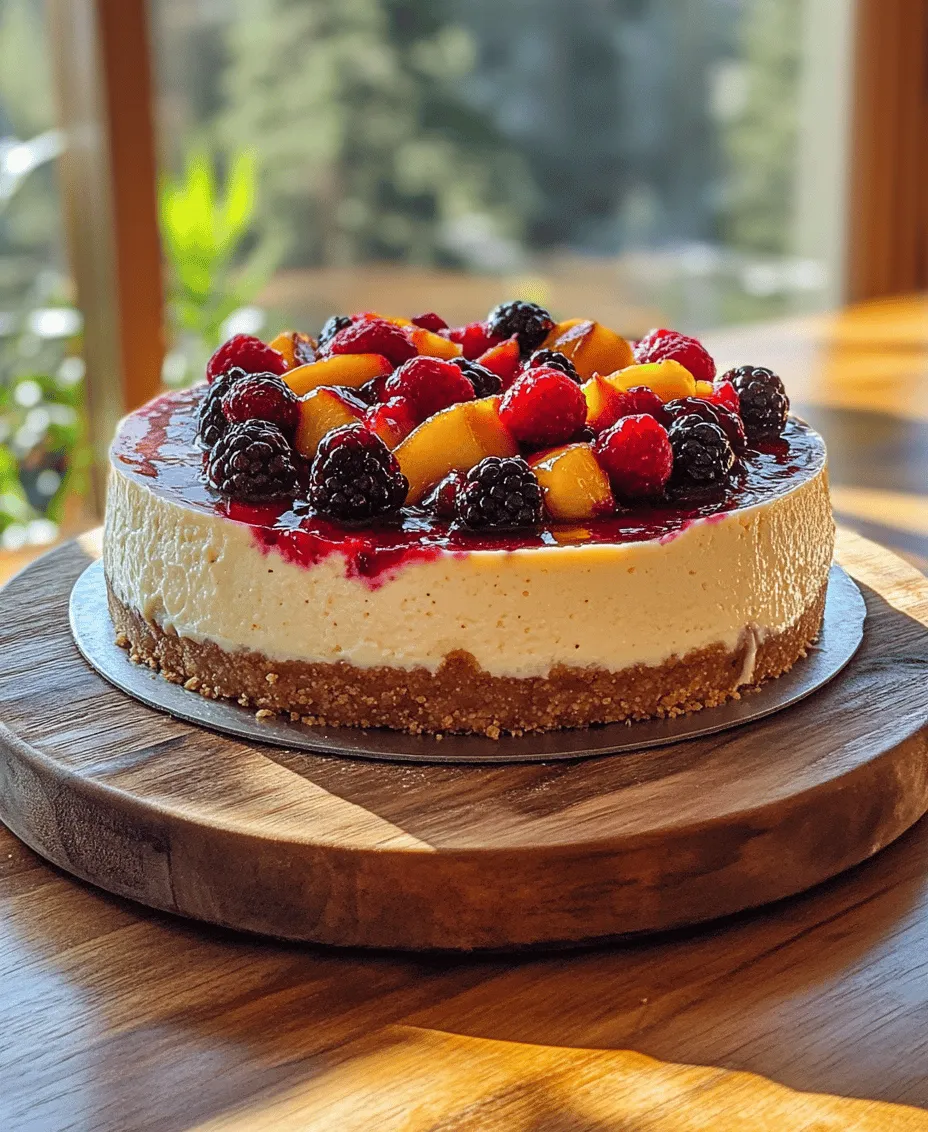
Berry Topping
No Summer Berry Peach Cheesecake would be complete without its crowning glory: the berry topping. This layer of fresh berries not only adds a pop of color to the dessert but also enhances the overall flavor profile. The sweetness of ripe peaches combined with the tartness of berries creates a harmonious balance that is refreshing and light.
Using a mix of berries, such as strawberries, blueberries, and raspberries, allows for a diverse range of flavors and textures in each bite. The natural juices released from the berries during the topping preparation can also create a beautiful glossy finish, making the cheesecake visually appealing.
Preparing the Crust
To kick off the process of creating your Summer Berry Peach Cheesecake, let’s dive into preparing the graham cracker crust. Follow these steps to ensure your crust is firm, flavorful, and holds its shape when you cut into the cheesecake:
Step 1: Gather Your Ingredients
Start with the following ingredients for the graham cracker crust:
– 1 ½ cups of graham cracker crumbs
– ½ cup of unsalted butter, melted
– ¼ cup of granulated sugar
– A pinch of salt
Step 2: Measure Ingredients Accurately
For the best results, it’s essential to measure your ingredients accurately. Too much butter can lead to a greasy crust, while too little can result in a crust that crumbles. Use a kitchen scale if possible, or level off your measuring cups with a straight edge for precision.
Step 3: Mix the Crust Ingredients
In a large mixing bowl, combine the graham cracker crumbs, sugar, and salt. Pour in the melted butter and mix until the crumbs are evenly coated and the mixture resembles wet sand. This ensures that the crust will hold together once baked.
Step 4: Press the Mixture into a Springform Pan
Transfer the crumb mixture into a 9-inch springform pan. Using the back of a measuring cup or your fingers, press the mixture firmly into the bottom and up the sides of the pan. Make sure the crust is evenly distributed, as uneven pressure can lead to a crust that cracks or breaks apart.
Step 5: Bake the Crust
Preheat your oven to 350°F (175°C). Place the springform pan in the oven and bake for about 10-12 minutes, or until the crust is lightly golden and fragrant. Baking the crust helps set its shape and enhances the flavor. Once baked, remove the crust from the oven and allow it to cool completely before adding the cheesecake filling.
Crafting the Cheesecake Filling
Once your graham cracker crust has cooled, it’s time to prepare the cheesecake filling. The filling is the star of the show, and following these detailed instructions will help ensure a smooth and creamy texture:
Step 1: Gather Your Ingredients
For the cheesecake filling, you will need:
– 24 ounces of cream cheese, softened
– 1 cup of granulated sugar
– 1 teaspoon of vanilla extract
– 3 large eggs
– 1 cup of heavy cream
Step 2: Soften the Cream Cheese
Before you start mixing, make sure the cream cheese is softened to room temperature. This step is crucial for achieving a smooth mixture. If you forget to take it out in advance, you can cut the cream cheese into small cubes and microwave them for about 15-20 seconds, checking frequently to avoid melting.
Step 3: Mix the Cream Cheese and Sugar
In a large mixing bowl, beat the softened cream cheese with an electric mixer on medium speed until smooth and creamy, about 2-3 minutes. Gradually add the granulated sugar, mixing until fully incorporated. Scrape down the sides of the bowl as needed to ensure everything is well combined.
Step 4: Add the Vanilla Extract and Eggs
Once the sugar is incorporated, add the vanilla extract and mix until combined. Then, add the eggs one at a time, mixing on low speed after each addition just until combined. Be cautious not to overmix the filling at this stage, as this can incorporate too much air, leading to cracks during baking.
Step 5: Incorporate the Heavy Cream
Finally, add the heavy cream to the mixture and beat on low speed until just combined. This ingredient adds to the richness and creaminess of the cheesecake.
By following these steps, you’ll create a cheesecake filling that is rich, creamy, and bursting with flavor.
This Summer Berry Peach Cheesecake will not only be a treat for the taste buds but also a stunning centerpiece for your summer gatherings. With fresh peaches and berries, it’s a reminder of the joys of the season, making it a dessert everyone will love.
Stay tuned for the next part, where we will explore how to assemble the cheesecake and prepare the berry topping for a truly unforgettable dessert experience.
Folding in Peaches and Berries
When it comes to adding the star ingredients of your Summer Berry Peach Cheesecake, it’s essential to fold in the peaches and berries gently. This technique is crucial to ensure the fruits are evenly distributed throughout the cheesecake batter without breaking them down into mushy pieces.
Tips for Even Distribution Without Breaking Fruit Pieces:
1. Use a Rubber Spatula: When folding in your fruit, opt for a rubber spatula. This tool is flexible and allows you to scoop from the bottom of the bowl, lifting the batter over the fruit rather than directly mixing it in.
2. Chop Fruit into Uniform Sizes: Cut your peaches into small, even pieces, about the size of your berries. This promotes even distribution and helps maintain the integrity of the pieces during baking.
3. Start with a Small Amount of Batter: Before adding the fruit, take a small portion of the cheesecake batter and mix it with the fruit in a separate bowl. This will coat the berries and peaches, making it easier to incorporate them into the larger batch without breaking them.
Baking the Cheesecake
Baking a cheesecake can be a delicate process, and following best practices is key to achieving the perfect texture and flavor.
Best Practices for Baking a Cheesecake:
1. Preheat Your Oven: Ensure your oven is preheated to 325°F (160°C) before placing your cheesecake inside. A consistent temperature is essential for even baking.
2. Using a Water Bath: To prevent the cheesecake from cracking, consider using a water bath. Wrap the outside of your springform pan with aluminum foil to avoid water seeping in, then place it in a larger pan filled with hot water. The steam will help regulate the temperature and moisture during baking.
3. Monitoring Baking Time for Desired Texture: The ideal cheesecake should have a slightly jiggly center when you take it out of the oven. This means it will continue to set as it cools. Check for doneness around the 50-minute mark, and if it’s not done, continue baking in 5-minute intervals.
Techniques to Prevent Cracking:
– Gradual Cooling: Once your cheesecake is done baking, turn off the oven and crack the oven door open. Let the cheesecake cool in the oven for an hour. This gradual temperature change helps prevent cracks from forming.
– Cooling on a Wire Rack: After the initial cooling in the oven, transfer the cheesecake to a wire rack to cool completely at room temperature. This will further reduce the chances of cracking.
The Science Behind Cheesecake Baking:
Understanding the setting process of a cheesecake is essential. The combination of cream cheese, eggs, and sugar creates a delicate balance. As the cheesecake bakes, the proteins in the eggs coagulate, helping the cake set. The gradual heating allows the structure to form without sudden temperature changes that can lead to cracks.
Creating the Berry Topping
While your cheesecake bakes, it’s the perfect time to prepare the berry topping that will crown your creation.
Step-by-Step Instructions for the Berry Topping:
1. Ingredients Preparation: In a medium saucepan, combine 2 cups of mixed berries (strawberries, blueberries, and raspberries) with 1/4 cup of sugar and 1 tablespoon of lemon juice. This combination will enhance the natural sweetness of the berries while adding a hint of tartness.
2. Cooking the Mixture: Cook the mixture over medium heat. Stir occasionally until the sugar has dissolved and the berries start to release their juices, about 5 minutes.
3. Thickening with Cornstarch: In a small bowl, mix 1 tablespoon of cornstarch with 2 tablespoons of cold water to create a slurry. Once the berries are bubbling, add the cornstarch mixture to the saucepan. Stir continuously for about 2 minutes until the topping thickens to your desired consistency.
4. Cooling: Remove the saucepan from the heat and let the berry topping cool to room temperature before using it. This is important, as adding hot topping to your cheesecake can cause it to melt and lose its shape.
Assembling and Chilling the Cheesecake
Once the cheesecake has cooled, it’s time to bring everything together.
Best Practices for Assembling the Cheesecake:
1. Ensure the Cheesecake is Completely Cooled: Before adding the berry topping, ensure your cheesecake has cooled completely and has been removed from the springform pan.
2. Spreading the Topping: Carefully spoon the berry topping onto the center of the cheesecake. Use a spatula to spread it evenly over the surface, ensuring you don’t disturb the cheesecake filling. Start from the center and work your way outwards.
3. Chilling the Cheesecake: After assembling, cover the cheesecake with plastic wrap and place it in the refrigerator. Aim for at least 4 hours of chilling time, but overnight is ideal. Chilling enhances the flavors and helps the cheesecake set properly.
Importance of Chilling: Chilling not only improves the texture of your cheesecake, making it firmer and creamier, but it also allows the flavors of the cream cheese and fruit to meld beautifully. The result is a dessert that is both refreshing and indulgent, perfect for summer gatherings.
Serving Suggestions
Presentation can elevate your cheesecake experience, making it even more enticing to your guests.
Presentation Ideas for Serving the Cheesecake:
1. Garnishing with Fresh Fruits: Just before serving, consider garnishing your cheesecake with additional fresh berries and peach slices for a pop of color. A sprig of mint can also add a refreshing touch.
2. Serving with Beverages: Pair your Summer Berry Peach Cheesecake with refreshing beverages such as iced tea or lemonade. The citrus notes will complement the flavors of the cheesecake while keeping your guests cool on hot summer days.
3. Serving Size: Cut the cheesecake into wedges for an elegant presentation. Serve on beautiful dessert plates, adding a dollop of whipped cream on the side for an extra indulgence.
Conclusion
Creating a Summer Berry Peach Cheesecake is not just about following a recipe; it’s about the joy of baking and sharing a delicious treat with loved ones. This dessert, with its creamy filling and vibrant fruit topping, serves as a perfect centerpiece for summer events and family gatherings.
The combination of sweet peaches and tangy berries brings a delightful balance to each slice, making it a crowd-pleaser that will leave your guests asking for seconds. Embrace the process of baking, experiment with flavors, and enjoy the satisfaction that comes with crafting a beautiful dessert from scratch.
Whether it’s a picnic, a birthday celebration, or simply a family dinner, this cheesecake is sure to impress and create lasting memories. So gather your ingredients, roll up your sleeves, and enjoy the delightful experience of making and sharing this summer-inspired treat.