Introduction
In today’s fast-paced world, preparing nutritious meals can feel like a daunting task, especially on busy evenings when time is scarce. Whether you’re juggling work commitments, family responsibilities, or social plans, cooking often takes a backseat. However, with the right approach and a repertoire of quick recipes, you can savor delicious homemade meals without spending hours in the kitchen.
Quick recipes are essential for anyone looking to maintain a healthy diet while managing a hectic lifestyle. They offer a perfect solution by combining speed, convenience, and nutrition, ensuring that you can enjoy a wholesome dinner without the hassle. Moreover, these meals can cater to a variety of tastes and dietary preferences, making it easy to please everyone at the table. From seafood lovers to vegetarians, quick recipes allow for creativity and flavor without compromising on health.
Highlighting the Appeal of Quick Recipes
The benefits of quick meal preparation are multifaceted. First and foremost, they save precious time. In our busy lives, it’s not uncommon to find ourselves racing against the clock, and the last thing we want is to spend hours on meal prep. Quick recipes provide a solution that fits seamlessly into your schedule, allowing you to whip up a delicious dinner in 30 minutes or less.
Beyond convenience, quick meals also offer significant nutritional advantages. When you prepare your meals at home, you have complete control over the ingredients, enabling you to choose fresh, wholesome options. This not only enhances the flavor of your dishes but also contributes to better overall health. Homemade meals can often be more nutritious than takeout or processed options, which tend to be higher in unhealthy fats, sugars, and sodium.
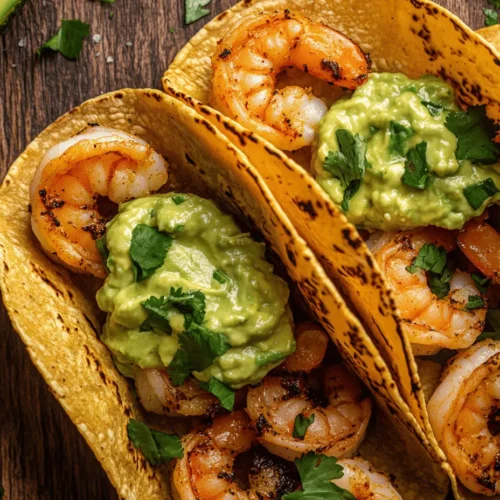
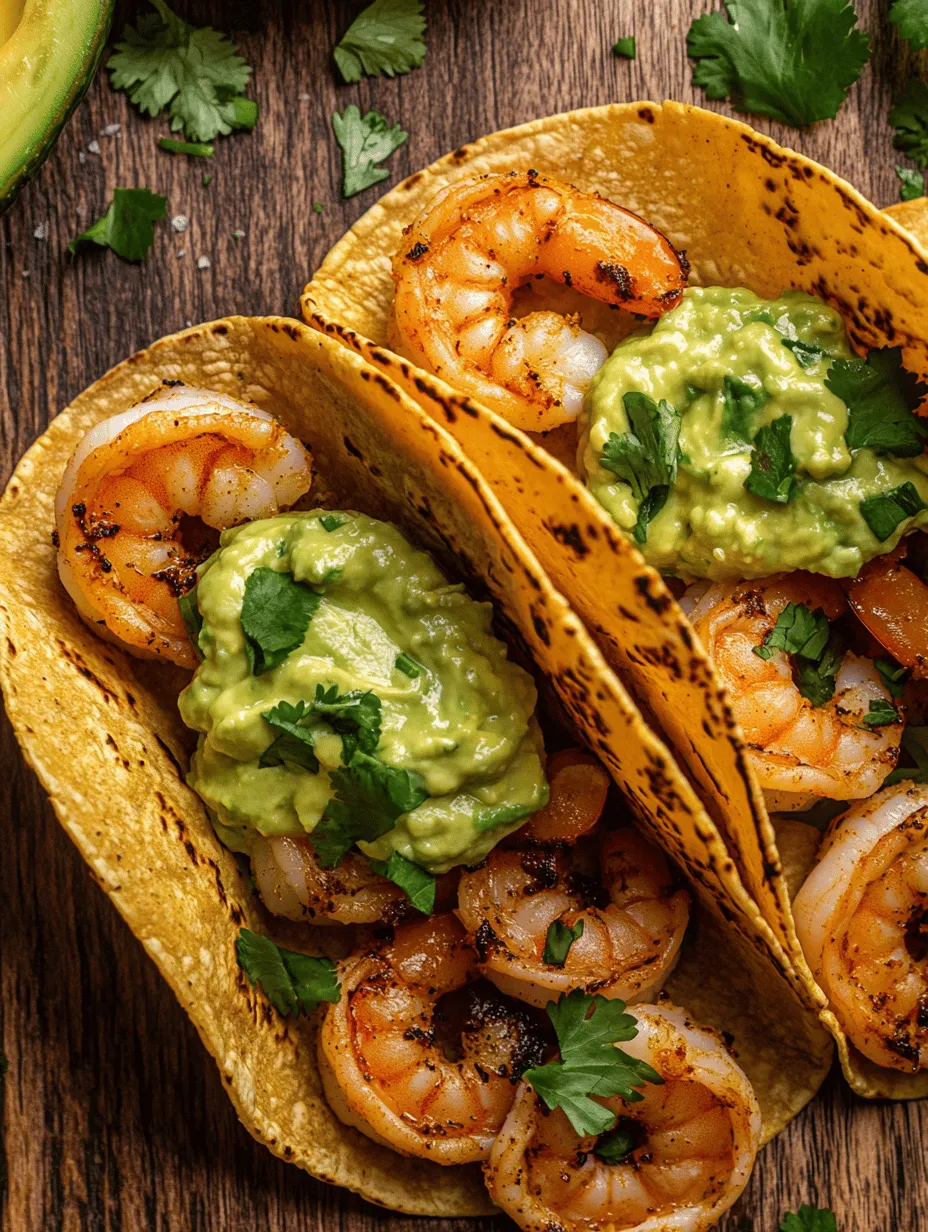
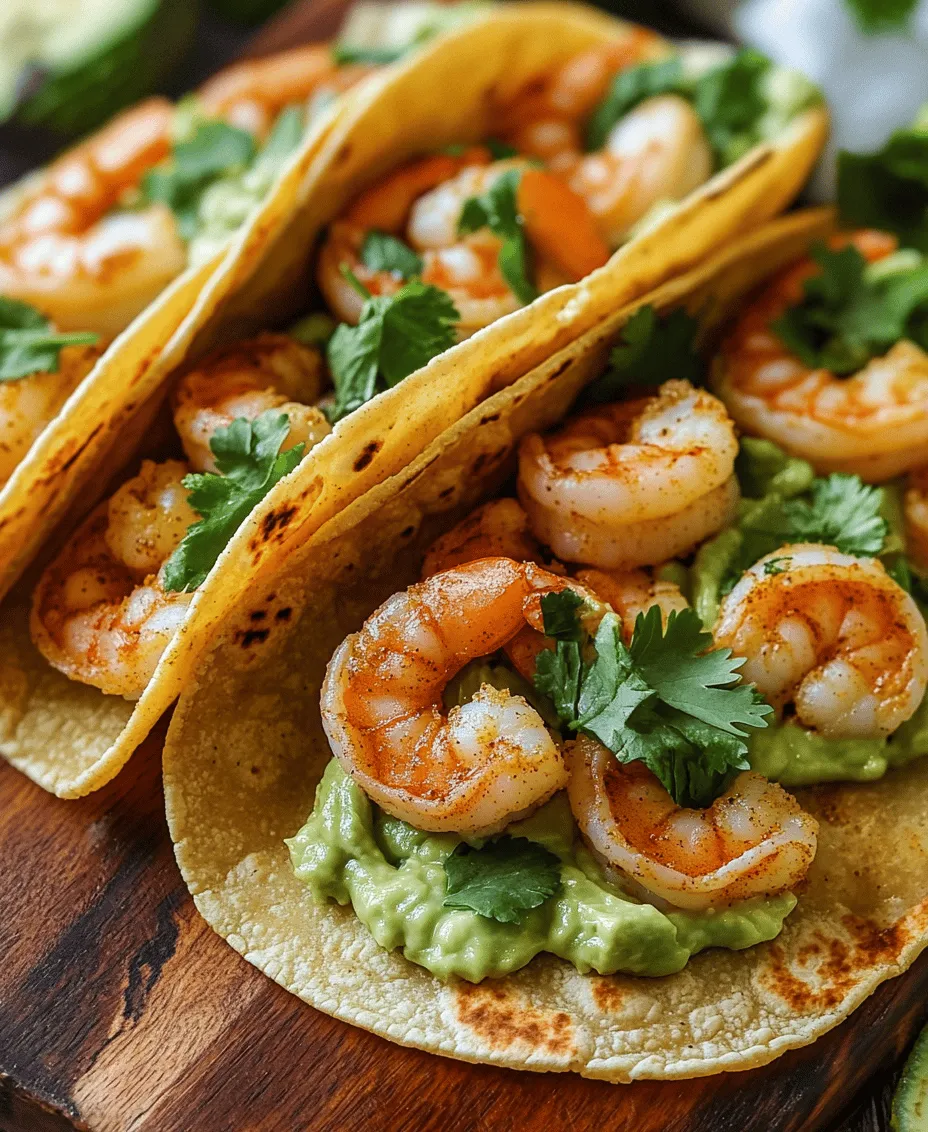
Now, let’s dive into one of the standout recipes that exemplify the essence of quick cooking: Quick Shrimp Tacos with Avocado Cream. This dish is a vibrant and flavorful option that seafood lovers will adore. It combines the freshness of shrimp with the creamy goodness of avocado, all wrapped in a warm tortilla. Perfect for a weeknight dinner or a casual gathering, these tacos are not only quick to prepare but also packed with nutrients.
Quick Shrimp Tacos with Avocado Cream
Ingredients
For this delightful dish, you’ll want to gather the following fresh ingredients:
– Shrimp: 1 pound of large shrimp, peeled and deveined
– Spices: 1 teaspoon of chili powder, 1 teaspoon of cumin, 1 teaspoon of garlic powder, salt, and pepper to taste
– Tortillas: 8 small corn or flour tortillas
– Avocado: 1 ripe avocado
– Lime: 1 lime, juiced
– Cilantro: Fresh cilantro for garnish
– Red onion: 1 small red onion, thinly sliced
– Tomato: 1 medium tomato, diced
– Cabbage: 1 cup of shredded cabbage (optional for crunch)
The combination of these ingredients creates a dish that is not only satisfying but also rich in flavor and nutrients. Shrimp is a fantastic source of lean protein, while avocados provide healthy fats and essential vitamins.
Step-by-Step Instructions
1. Preparation of Shrimp with Spices
Start by rinsing the shrimp under cold water and patting them dry with paper towels. This ensures they cook evenly and get that nice sear we’re looking for. In a mixing bowl, combine the shrimp with the spices: chili powder, cumin, garlic powder, salt, and pepper. Toss the shrimp until they are evenly coated in the spice mixture. Allow them to marinate for about 10 minutes, which enhances the flavor and allows the spices to penetrate the shrimp.
2. Cooking Technique for Perfect Shrimp
In a large skillet, heat a drizzle of olive oil over medium-high heat. Once the oil is shimmering, add the marinated shrimp to the skillet in a single layer. Avoid overcrowding the pan, as this can cause the shrimp to steam rather than sear. Cook the shrimp for 2-3 minutes on each side or until they turn pink and opaque. Be careful not to overcook them, as shrimp can become rubbery. Once cooked, remove the skillet from the heat and set the shrimp aside.
3. Making the Avocado Cream
While the shrimp cooks, it’s the perfect time to prepare the avocado cream. In a blender or food processor, combine the ripe avocado, lime juice, and a pinch of salt. Blend until smooth and creamy, adding a splash of water if necessary to achieve your desired consistency. This creamy sauce adds a rich flavor and velvety texture to the tacos, balancing the spices from the shrimp beautifully.
4. Assembling the Tacos
Now that all components are ready, it’s time to assemble your tacos. Start by warming the tortillas in a dry skillet over medium heat for about 30 seconds on each side, or until they’re pliable and slightly toasted. This step enhances the flavor of the tortillas and makes them easier to fold.
On each tortilla, add a generous scoop of shrimp, followed by a dollop of avocado cream. Top with sliced red onion, diced tomatoes, shredded cabbage, and a sprinkle of fresh cilantro. The bright colors and textures will make your tacos not only delicious but visually appealing as well.
Nutritional Benefits of Shrimp and Avocados
Both shrimp and avocados are nutritional powerhouses. Shrimp is low in calories yet high in protein, making it an ideal choice for those looking to maintain or build muscle without adding excess fat. It’s also rich in essential minerals like selenium and vitamin B12, which are crucial for overall health.
Avocados, on the other hand, are packed with monounsaturated fats, which are heart-healthy and can help lower bad cholesterol levels. They are also high in fiber, aiding in digestion and promoting feelings of fullness. Together, these ingredients create a balanced meal that is both satisfying and nourishing.
Stay tuned for the next section, where we’ll explore another quick and delightful recipe: 15-Minute Garlic Butter Pasta. This classic comfort food is sure to become a favorite for anyone looking for a speedy yet delicious dinner option.
Sautéing Sweet Potatoes for Texture
To create a delightful and textured filling for your shrimp tacos, the first step is to sauté sweet potatoes. Sweet potatoes are not only a nutritious option that adds natural sweetness to the dish but also provide a substantial contrast to the tender shrimp. Begin by peeling and dicing two medium-sized sweet potatoes into small cubes, about half an inch in size. This size ensures they cook evenly and quickly.
Heat two tablespoons of olive oil in a large skillet over medium heat. Once the oil is shimmering, add the diced sweet potatoes. Sauté them for about 10-12 minutes, stirring occasionally, until they are tender and slightly caramelized. The natural sugars in the sweet potatoes will enhance the overall flavor profile of the tacos, while their creamy texture complements the shrimp beautifully. Season with a pinch of salt and pepper to elevate their taste, and keep them warm as you prepare the other components of your tacos.
Combining Flavors with Coconut Milk and Curry Paste
Once your sweet potatoes are perfectly sautéed, it’s time to elevate the flavor with a creamy coconut curry sauce. In a separate bowl, combine one can (about 13.5 ounces) of full-fat coconut milk with two tablespoons of red curry paste. This mixture will infuse your shrimp and sweet potatoes with a rich, aromatic flavor that is both comforting and exotic.
After mixing the coconut milk and curry paste, pour the blend into the skillet with the sautéed sweet potatoes. Allow it to simmer over low heat for about 5 minutes, stirring occasionally. This step is crucial as it allows the sweet potatoes to absorb the coconut and curry flavors fully. Once the sauce thickens slightly, it’s time to add your shrimp.
Add one pound of peeled and deveined shrimp to the skillet. Cook them for about 3-4 minutes until they turn pink and opaque. The shrimp will soak up the flavor of the coconut curry sauce, creating a delicious and harmonious blend of tastes. Stir gently to ensure the shrimp are well-coated in the sauce.
Finishing with Fresh Spinach for Nutrition
To enhance the nutritional profile of your shrimp tacos, incorporate fresh spinach at the end of the cooking process. Spinach is a powerhouse of vitamins and adds a lovely color to your dish. Simply add a couple of handfuls of fresh spinach to the skillet once the shrimp are cooked. Stir gently until the spinach wilts, which should take about 1-2 minutes.
The wilted spinach not only adds a vibrant green hue to your tacos but also contributes a wealth of nutrients, including iron and vitamins A and C. This final step ensures your meal is balanced with protein, healthy fats, and essential vitamins, making it not only delicious but also wholesome.
Discussion on Serving Options with Rice and Flavor Profiles
Your quick shrimp tacos are now ready to be served, but consider making your meal even more satisfying by pairing them with a side of fluffy coconut rice. To prepare the rice, rinse one cup of jasmine rice under cold water until the water runs clear. Cook it according to package instructions, but replace half of the water with coconut milk for a subtle sweetness that complements the tacos.
Another serving suggestion is to create a taco bar. Set out the shrimp and sweet potato mixture in one bowl and let your guests assemble their tacos. Provide a variety of toppings such as shredded cabbage, chopped cilantro, lime wedges, and hot sauce. This interactive dining experience encourages creativity and allows everyone to customize their tacos to their liking.
For a contrasting flavor profile, consider serving your tacos with a side of mango salsa. The freshness and sweetness of the mango will enhance the savory shrimp and sweet potatoes, creating a delightful balance of flavors.
Quick Turkey Burgers with Avocado
If you’re looking for a healthy twist on classic burgers, these quick turkey burgers with avocado are a perfect choice. Lean turkey meat is not only a great source of protein but also low in fat, making it an excellent option for those looking to eat healthier without sacrificing flavor.
Ingredients Highlighting Lean Protein and Healthy Fats
To make these turkey burgers, you will need the following ingredients:
– 1 pound ground turkey
– 1 teaspoon garlic powder
– 1 teaspoon onion powder
– 1 teaspoon paprika
– Salt and pepper to taste
– 1 ripe avocado, sliced
– Whole wheat burger buns
– Optional toppings: lettuce, tomato, and your favorite condiments
This simple ingredient list showcases the lean protein from the turkey and the healthy fats provided by the avocado, making it a nutritious meal option.
Cooking Process
Mixing Turkey with Spices and Shaping Patties
In a medium-sized bowl, combine the ground turkey with garlic powder, onion powder, paprika, salt, and pepper. Mix gently until the spices are evenly distributed throughout the meat. Be careful not to overmix, as this can lead to tough burgers.
Once combined, divide the mixture into four equal portions and shape them into patties, about ¾ inch thick. Make a small indentation in the center of each patty to prevent them from puffing up while cooking.
Cooking Tips for Juicy Burgers
To achieve juicy turkey burgers, it’s crucial to cook them over medium heat. Preheat a grill or skillet over medium heat and lightly grease it to prevent sticking. Cook the patties for about 5-6 minutes on each side, or until the internal temperature reaches 165°F.
For added flavor, consider adding a slice of cheese during the last minute of cooking, allowing it to melt beautifully over the turkey. This step can elevate your burgers to a whole new level of deliciousness.
Assembling the Burgers with Fresh Toppings for Added Flavor
Once your turkey patties are cooked to perfection, it’s time to assemble your burgers. Toast the whole wheat burger buns if desired, then place a patty on the bottom half of each bun. Top with sliced avocado, fresh lettuce, and tomato slices. Add your favorite condiments such as mustard or mayonnaise for extra flavor.
Serve the burgers immediately with a side of sweet potato fries or a fresh salad for a well-rounded meal that is both satisfying and nutritious.
Hearty Quinoa Salad Bowl
For a nutritious and filling dish, a hearty quinoa salad bowl is an excellent option, especially for meal prep. Quinoa is a complete protein, containing all nine essential amino acids, making it a fantastic base for a well-rounded salad.
Ingredients Emphasizing the Health Benefits of Quinoa and Beans
To prepare this quinoa salad bowl, gather the following ingredients:
– 1 cup quinoa
– 2 cups vegetable broth or water
– 1 can (15 oz) black beans, rinsed and drained
– 1 cup cherry tomatoes, halved
– 1 cup corn (fresh or frozen)
– 1 avocado, diced
– Fresh cilantro, chopped
– Lime juice, salt, and pepper to taste
This colorful array of ingredients not only makes for a visually appealing dish but also packs a punch of nutrients, fiber, and flavor.
Preparation Method
Cooking Quinoa to Fluffy Perfection
Rinse the quinoa under cold water to remove its natural coating, which can make it taste bitter. In a medium saucepan, combine the rinsed quinoa with vegetable broth or water and bring it to a boil. Once boiling, reduce the heat to low, cover, and let it simmer for about 15 minutes, or until the liquid is absorbed and the quinoa is fluffy. Remove from heat and let it sit covered for an additional 5 minutes. Fluff with a fork before transferring it to a large mixing bowl.
Mixing Ingredients for a Balanced Salad
In the bowl with the cooked quinoa, add the black beans, cherry tomatoes, corn, and diced avocado. Drizzle with lime juice and season with salt and pepper to taste. Gently toss all the ingredients together until well combined. The lime juice not only adds flavor but also prevents the avocado from browning.
Discussion on the Versatility of Quinoa Salads and Serving Suggestions
One of the best aspects of quinoa salads is their versatility. You can easily customize this salad by adding other vegetables, nuts, or seeds based on your preferences or what you have on hand. For an extra crunch, consider adding chopped bell peppers or cucumbers, or for a bit of sweetness, throw in some diced mango or pineapple.
This salad can be served as a main dish or as a side, making it an excellent option for gatherings or meal prep. Store it in airtight containers in the refrigerator for up to three days, allowing the flavors to meld beautifully over time.
15-Minute Pita Pizzas
For a fun and customizable pizza option, look no further than these quick pita pizzas. They are perfect for busy weeknights or as a creative way to involve kids in the kitchen.
Ingredients Highlighting Convenience and Creativity
To make these pita pizzas, you will need:
– Whole wheat pita bread
– Tomato sauce or pesto
– Shredded mozzarella cheese
– Assorted toppings: pepperoni, bell peppers, onions, mushrooms, olives, etc.
This simple ingredient list provides the foundation for your personal pizza creations, allowing endless possibilities based on your preferences.
Cooking Instructions
Preparing Pita Bases and Adding Sauce
Preheat your oven to 400°F (200°C). Place the whole wheat pita bread on a baking sheet. Spread a generous layer of tomato sauce or pesto on each pita, making sure to cover it evenly.
Baking Tips for Achieving Crispy Cheese
Sprinkle a generous amount of shredded mozzarella cheese over the sauce, followed by your choice of toppings. Bake in the preheated oven for about 8-10 minutes, or until the cheese is melted and bubbly, and the edges of the pita are crispy.
Discussion on the Endless Topping Possibilities
One of the best things about pita pizzas is the ability to customize them based on what you have in your fridge. Experiment with different sauces like BBQ or Alfredo, and mix and match toppings to create unique flavor combinations. They are also a great way to use up leftover vegetables or meats.
Serve the pita pizzas hot out of the oven with a side salad for a complete meal that is both satisfying and fun to eat.
Instant Noodle Stir-Fry
For a quick Asian-inspired meal that’s bursting with flavor, try this instant noodle stir-fry. It’s perfect for busy evenings when you need something hearty and satisfying in no time.
Ingredients Showcasing Simplicity and Flavor
To make this dish, you will need:
– 2 packs of instant noodles (discard the seasoning packets)
– 2 cups mixed vegetables (fresh or frozen)
– 2 tablespoons soy sauce
– 1 tablespoon sesame oil
– Optional: 1 egg, beaten
This simple recipe emphasizes the ease of preparation while providing a satisfying meal.
Cooking Instructions
Preparing Instant Noodles and Stir-Frying Vegetables
Bring a pot of water to a boil and cook the instant noodles according to package instructions, usually about 3 minutes. Drain and set aside.
In a large skillet or wok, heat sesame oil over medium-high heat. Add the mixed vegetables and stir-fry for about 3-4 minutes until they are tender-crisp. If you’re adding an egg, push the vegetables to one side of the pan, pour in the beaten egg, and scramble until cooked, then mix everything together.
Combining Flavors with Soy Sauce and Optional Egg
Add the cooked noodles to the skillet, followed by the soy sauce. Toss everything together for another minute to ensure the noodles are heated through and well-coated in the sauce.
Discussion on Nutritional Considerations and Customization
This instant noodle stir-fry is not just quick; it’s also highly customizable. You can use any vegetables you have on hand, such as bell peppers, broccoli, or snap peas. For added protein, consider tossing in some cooked chicken, shrimp, or tofu.
The dish is perfect for those who want a warm, comforting meal without spending too much time in the kitchen. Plus, it’s an excellent option for meal prep—simply divide it into containers for easy reheating throughout the week.
Conclusion
In this collection of quick and delicious recipes, we showcased a variety of meals that are perfect for busy evenings. From the vibrant shrimp tacos with avocado cream to the hearty quinoa salad bowl, each dish emphasizes the joy of cooking and sharing meals with loved ones.
Whether you’re in the mood for a healthy turkey burger or a fun pita pizza, there’s something for everyone to enjoy. We encourage you to experiment with ingredients and flavors, allowing your creativity to shine in the kitchen. Cooking should be an enjoyable experience, even on hectic days, and these recipes are designed to help you create delicious, wholesome meals that everyone will love. Happy cooking!