
Desserts have a magical way of captivating our senses, and one treat that truly stands out in the realm of indulgence is the Decadent Red Velvet Oreo Cheesecake. This dessert masterfully combines the lush creaminess of cheesecake with the nostalgic crunch of Oreo cookies and the classic allure of red velvet cake. Imagine slicing through a velvety, crimson-hued cheesecake, revealing layers of rich flavor that dance on your palate. It’s a dessert that represents comfort and celebration all at once, making it a perfect choice for various occasions—from a festive gathering to a cozy night in spent enjoying the company of loved ones.
The origins of red velvet cake trace back to the early 20th century, becoming a Southern classic that was cherished for its unique flavor and striking appearance. When you introduce the beloved Oreo cookie into this equation, you create a harmonious blend that elevates the traditional cheesecake to new heights. The combination of flavors—rich chocolatey notes from the Oreos, the subtle tang of cream cheese, and the distinct taste of red velvet—creates a dessert that is both familiar and extraordinary. Whether you’re celebrating a birthday, hosting a holiday dinner, or simply treating yourself, this Red Velvet Oreo Cheesecake is sure to impress.
In this article, we will explore the key ingredients that make this dessert so irresistible, followed by a detailed guide on crafting the perfect cheesecake. Each step will be clearly outlined to ensure your baking experience is as enjoyable as the dessert itself.
Understanding the Ingredients: Key Components of Red Velvet Oreo Cheesecake
To create the Decadent Red Velvet Oreo Cheesecake, it’s essential to understand the role of each ingredient. The balance of flavors and textures is what makes this dessert an unforgettable experience.
The Crust
The crust is an integral part of any cheesecake, and in this recipe, we use Oreo cookies as the base. The rich chocolate flavor of the Oreo cookies, combined with the buttery goodness of melted butter, creates a flavorful and textured foundation that complements the creamy filling perfectly. The process begins by finely crushing the Oreos into crumbs; this can be done using a food processor or by placing them in a zip-top bag and crushing them with a rolling pin. Once you have your Oreo crumbs, mixing them with melted butter ensures that the crust holds together well when pressed into the springform pan.
Baking the crust for a short period not only helps set it but also enhances the flavors, giving it a slight crispness that contrasts beautifully with the smooth cheesecake filling. This step is crucial, as it lays the groundwork for the delightful layers that will follow.
The Cheesecake Filling
The filling is where all the magic happens. The primary components include cream cheese, sugar, eggs, and sour cream, each playing a vital role in achieving that signature creamy texture.
– Cream Cheese: This is the star of the show, providing that rich, dense creaminess that cheesecake lovers crave. It’s essential to use full-fat cream cheese for the best results, as it yields a smoother, silkier filling.
– Sugar: This ingredient sweetens the filling and balances the tanginess of the cream cheese. Granulated sugar is typically used, but you can experiment with alternatives if desired.
– Eggs: Eggs act as a binding agent, giving the cheesecake structure. It’s important to incorporate them one at a time, allowing for even mixing without overbeating, which can lead to cracks in your cheesecake.
– Sour Cream: Adding sour cream not only enhances the flavor profile with a slight tang but also contributes to the overall creaminess of the filling. The richness that sour cream provides cannot be overstated—it adds a layer of decadence that is simply irresistible.
Next, we incorporate red velvet cake mix into the filling. This ingredient not only provides that iconic deep red color but also adds a subtle hint of cocoa flavor that complements the other ingredients beautifully. The cake mix gives the cheesecake an extra element of indulgence, transforming it from a simple cheesecake into a luxurious dessert that is sure to wow your guests.
The Topping
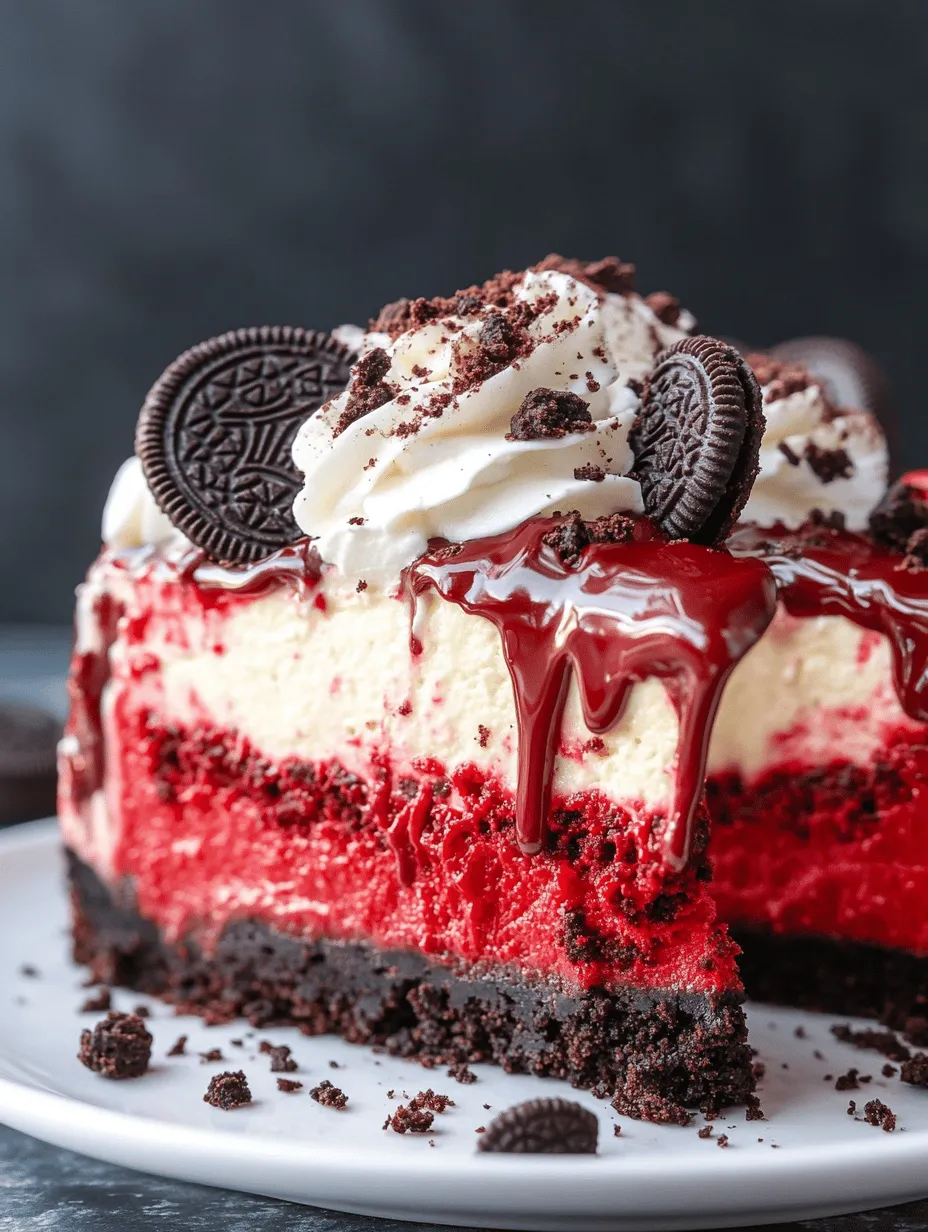
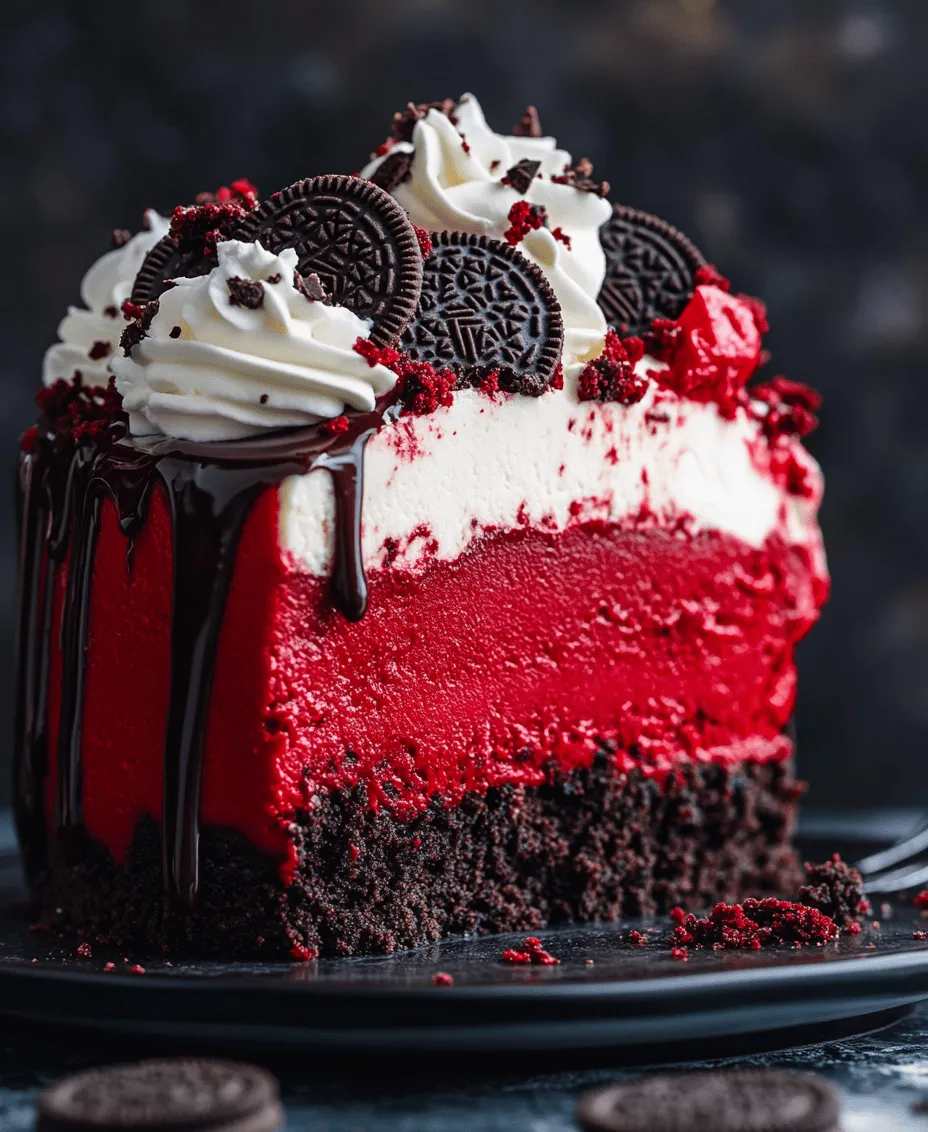
No cheesecake is complete without a stunning topping, and this Red Velvet Oreo Cheesecake is no exception. The topping typically consists of whipped cream, crushed Oreos, and, for those who want to take it a step further, a drizzle of chocolate sauce.
– Whipped Cream: Fresh whipped cream adds a light, airy texture that contrasts wonderfully with the dense cheesecake. It can be piped onto the cheesecake for an elegant presentation or simply dolloped on top.
– Crushed Oreos: Sprinkling crushed Oreos on top not only enhances the visual appeal of the cheesecake but also adds a delightful crunch that complements the creamy filling.
– Chocolate Drizzle: If you’re feeling adventurous, a drizzle of chocolate sauce can elevate the dessert, providing an additional layer of flavor that pairs beautifully with the other components. It’s a simple touch that can turn an already indulgent dessert into a showstopper.
Step-by-Step Instructions: Crafting the Perfect Cheesecake
Now that we have a solid understanding of the ingredients, let’s dive into the step-by-step instructions for creating this decadent Red Velvet Oreo Cheesecake. Each stage is designed to guide you through the process, ensuring that you achieve the best results possible.
Preparing the Crust
1. Preheat the Oven: Start by preheating your oven to 350°F (175°C). This ensures that the crust bakes evenly and sets perfectly.
2. Crush the Oreos: In a food processor, add the Oreo cookies and pulse until you achieve fine crumbs. Alternatively, you can place the Oreos in a zip-top bag and crush them with a rolling pin.
3. Mix with Butter: In a medium bowl, combine the crushed Oreos with melted butter. Stir until the crumbs are fully coated, and the mixture resembles wet sand.
4. Press into Pan: Grease a 9-inch springform pan with cooking spray. Pour the Oreo mixture into the pan and press it firmly into the bottom using the back of a measuring cup or your fingers. Ensure it is evenly distributed.
5. Bake the Crust: Place the pan in the preheated oven and bake for about 10 minutes. This step helps the crust set and enhances its flavor. Once baked, remove it from the oven and allow it to cool while you prepare the filling.
Making the Cheesecake Filling
1. Beat the Cream Cheese: In a large mixing bowl, use an electric mixer to beat the cream cheese until it is smooth and creamy. This step is crucial as it sets the foundation for a silky cheesecake.
2. Add Sugar: Gradually add the granulated sugar to the cream cheese, beating well after each addition until fully combined and smooth.
3. Incorporate Eggs: Add the eggs one at a time, mixing on low speed until just combined. Be cautious not to overmix, as this can introduce air into the batter and lead to cracks during baking.
4. Mix in Sour Cream and Cake Mix: Once the eggs are incorporated, add the sour cream and red velvet cake mix. Mix until fully blended, ensuring there are no lumps. The mixture should be thick and creamy.
5. Pour into Crust: Carefully pour the cheesecake filling over the cooled Oreo crust, smoothing the top with a spatula for an even finish.
Baking the Cheesecake
1. Prepare for Water Bath: To prevent cracking, it’s recommended to bake the cheesecake in a water bath. Wrap the bottom of the springform pan with aluminum foil to prevent water from seeping in.
2. Bake: Place the wrapped pan into a larger baking dish and fill the outer dish with hot water until it reaches halfway up the sides of the springform pan. Bake the cheesecake in the preheated oven for about 60-70 minutes, or until the edges are set but the center slightly jiggles.
3. Cool and Chill: After baking, turn off the oven and leave the cheesecake inside with the door ajar for about an hour. This gradual cooling process helps prevent cracks. Once cooled, remove the cheesecake from the oven and water bath, then refrigerate for at least 4 hours or overnight for best results.
As you embark on this delicious journey of creating your Decadent Red Velvet Oreo Cheesecake, you’ll discover how each ingredient and step contributes to the final masterpiece. The blend of flavors and textures promises an indulgent experience that is both satisfying and memorable. In the next part of the article, we will delve into tips for achieving the best results and answer some common questions about this delectable dessert. Stay tuned for more insights and guidance on perfecting your cheesecake game!
Integrating Ingredients Gently for Structure
When creating a decadent Red Velvet Oreo Cheesecake, it’s crucial to maintain its creamy structure while ensuring that every bite is infused with rich flavors. Begin by carefully folding in the red velvet cake mix and chopped Oreos into the cheesecake batter. To do this, use a spatula or large wooden spoon for a gentle approach. Start by adding a small portion of the cake mix to the cream cheese mixture, folding it in using a figure-eight motion. This technique helps prevent overmixing, which can lead to a denser texture than desired.
Once the cake mix is incorporated, gradually add in the chopped Oreos. Aim for an even distribution throughout the mixture, allowing the pieces to be visible in the final product. The key here is to maintain the airiness of the batter, ensuring that your cheesecake will be light and fluffy, yet decadently rich—just as a cheesecake should be.
Baking Process: Perfectly Timing for Texture
The baking process is where the magic happens, transforming your creamy batter into a luscious cheesecake. Preheat your oven to 325°F (160°C). Pour the cheesecake mixture into a prepared springform pan, ensuring it’s evenly spread across the bottom. To create an even texture, you can gently tap the pan against the counter to release any air bubbles trapped within the batter.
Bake the cheesecake for about 55-65 minutes. An important tip during this stage is to keep an eye on the center of the cheesecake. It should appear set around the edges but still have a slightly jiggly center when you gently shake the pan. This jiggle is a good indicator that your cheesecake will have the perfect creamy texture rather than becoming dry and crumbly. Once baked, turn off the oven and crack the door slightly, allowing the cheesecake to cool gradually inside for about an hour. This cooling process helps prevent cracks from forming on the surface.
Chilling the Cheesecake: Enhancing Flavor and Texture
After the cheesecake has cooled in the oven, it’s essential to transfer it to the refrigerator for at least 4 hours, preferably overnight. Chilling is not just about setting the cheesecake; it allows the flavors to meld beautifully, creating a more complex and satisfying taste. The cold temperature also helps firm up the texture, making it easier to slice and serve.
As the cheesecake chills, the creamy, rich filling will solidify, providing that perfect balance of indulgence and stability. If you’re eager to serve it sooner, at least give it a minimum of 4 hours in the fridge, but overnight chilling truly elevates the overall experience.
Creating the Perfect Topping: Presentation Matters
Now that your Red Velvet Oreo Cheesecake is perfectly set, it’s time to add the finishing touches that will make it a showstopper. Presentation is key when it comes to desserts, and a little effort can go a long way.
Whipped Cream Application
Start by preparing a batch of fresh whipped cream. To achieve a smooth application, use chilled utensils and a large bowl. Whip heavy cream with powdered sugar and vanilla extract until soft peaks form. For a more elegant look, use a piping bag fitted with a star tip to create beautiful swirls on top of the cheesecake. If you prefer a rustic style, simply spread the whipped cream evenly across the surface with a spatula.
Decorative Elements
To elevate the visual appeal, consider adding crushed Oreos and red velvet crumbs on top of the whipped cream. The contrast of colors and textures will entice anyone who lays eyes on your dessert. For an extra touch of sophistication, drizzle some melted chocolate over the top. This not only adds a gourmet flair but also enhances the flavor profile, complementing the rich cheesecake beautifully.
Serving Suggestions: Enjoying Your Decadent Creation
When it comes to serving your Red Velvet Oreo Cheesecake, presentation is key. Use a sharp knife to slice the cheesecake into even portions, cleaning the knife between cuts to maintain clean lines. Each slice should showcase the beautiful layers of red velvet and creamy filling.
For an elegant touch, serve each slice on a decorative plate, perhaps with a dollop of extra whipped cream on the side. Complement this indulgent dessert with a glass of milk, a cup of coffee, or even a dessert wine, enhancing the overall experience.
You may also want to consider pairing your cheesecake with fresh berries, such as raspberries or strawberries. The tartness of the fruit cuts through the richness of the cheesecake, providing a delightful balance.
Nutritional Information: Understanding Your Indulgence
As with any indulgent dessert, understanding the nutritional aspects of your Red Velvet Oreo Cheesecake is essential. A typical slice can contain around 350-450 calories, depending on the size and specific ingredients used. Key nutrients include:
– Fat: Primarily from cream cheese and heavy cream, contributing to the rich texture.
– Carbohydrates: Coming from sugar and cake mix, providing sweetness.
– Protein: From the cream cheese and eggs, essential for structure.
While this cheesecake is a treat, moderation is key. Enjoying it as an occasional dessert rather than a daily indulgence will allow you to savor the flavors without overdoing it. Practicing mindful eating, such as savoring each bite and sharing with others, can enhance your experience and help maintain balance in your diet.
Conclusion: The Joy of Baking and Sharing Decadent Desserts
Baking a Red Velvet Oreo Cheesecake is more than just following a recipe; it’s about the joy of creating something beautiful and delicious to share with friends and family. From the gentle mixing of ingredients to the artful presentation, each step is an opportunity to express your creativity and love for baking.
As you slice into your cheesecake and serve it to loved ones, you’ll witness the smiles and delight it brings. Baking is not just about the finished product but the moments and memories created along the way. So, embrace your baking journey, experiment with flavors, and celebrate the joyful moments that great food can bring to life. Enjoy the decadent flavors of your creation and the happiness it fosters in your home.