
Introduction
There’s something inherently satisfying about the combination of chocolate and peanut butter. This classic pairing has delighted taste buds for generations, offering a rich, creamy, and indulgent experience that’s hard to resist. From peanut butter cups to brownies, the versatility of this duo knows no bounds. Among the myriad of ways to enjoy these flavors, the Reese’s Peanut Butter Cup Roll Cake stands out as a showstopper. This dessert not only tantalizes the palate but also serves as a visual masterpiece, perfect for impressing guests at gatherings or celebrating special occasions.
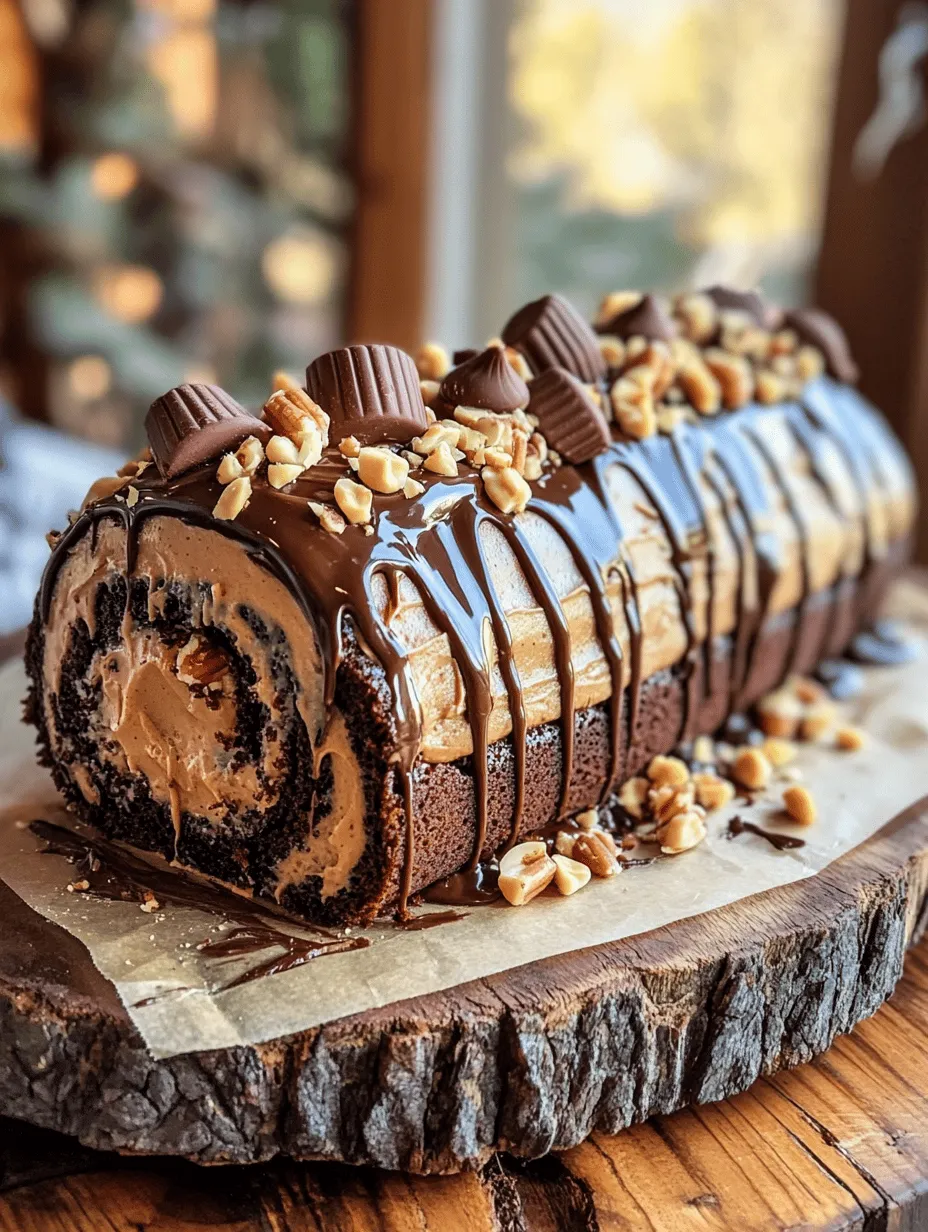
The beauty of the Reese’s Peanut Butter Cup Roll Cake lies in its unique presentation. Imagine a light chocolate sponge cake rolled around a luscious peanut butter filling, all topped with a rich chocolate ganache and adorned with chunks of Reese’s Peanut Butter Cups. It’s a deliciously decadent dessert that takes the beloved flavors of Reese’s to new heights. In this article, we will guide you through the process of creating this indulgent treat, ensuring that your cake is not only delicious but also a stunning centerpiece for any celebration.
Understanding the Ingredients
To create the ultimate Reese’s Peanut Butter Cup Roll Cake, it is essential to understand the key components that come together to build its flavor and texture. This cake is made up of three primary components: the chocolate cake base, the peanut butter filling, and the chocolate ganache.
Key Components
1. Chocolate Cake Base: The foundation of our roll cake, the chocolate sponge, provides a light and airy texture that is crucial for rolling. This cake is typically made with all-purpose flour, unsweetened cocoa powder, sugar, eggs, and vegetable oil. The cocoa powder not only adds depth of flavor but also contributes to the cake’s dark color, while the eggs help to create a light, sponge-like consistency.
2. Peanut Butter Filling: The star of the show, this filling is creamy and rich, made primarily from creamy peanut butter, powdered sugar, and heavy cream. The peanut butter provides that signature flavor, while the heavy cream adds lightness, making the filling fluffy and easy to spread.
3. Chocolate Ganache: Topping off the roll cake is a luscious chocolate ganache, made from semi-sweet chocolate and heavy cream. This silky sauce not only enhances the flavor but also adds a beautiful glossy finish, making the dessert even more appealing.
Quality Ingredients Matter
When it comes to baking, the quality of your ingredients can significantly impact the final product. For this recipe, it is particularly important to use high-quality chocolate and peanut butter. Opting for a rich, dark chocolate will enhance the flavor of the ganache, while a creamy peanut butter will ensure that the filling is smooth and indulgent. By investing in good-quality ingredients, you set your cake up for success, resulting in a treat that’s not only delicious but also memorable.
The Cake Base
Now that we have an understanding of the ingredients, let’s delve into the process of making the chocolate roll cake batter. This step is crucial, as the cake serves as the structure for our roll cake, and getting it right is essential for a successful outcome.
Making the Chocolate Roll Cake Batter
1. Sifting Dry Ingredients: Begin by preheating your oven to 350°F (175°C) and preparing a jelly roll pan by lining it with parchment paper. This step is vital as it prevents the cake from sticking and ensures easy removal later. In a mixing bowl, sift together the all-purpose flour, unsweetened cocoa powder, baking powder, and salt. Sifting not only removes lumps but also aerates the flour, which contributes to a lighter cake.
2. Mixing the Batter: In a separate bowl, beat together the eggs and granulated sugar until the mixture becomes pale and fluffy. This process typically takes about 3-5 minutes with an electric mixer. The goal is to incorporate air into the eggs, which will help the cake rise. Once the egg mixture is ready, gently fold in the sifted dry ingredients, being careful not to overmix. Overmixing can lead to a dense cake, so a gentle folding motion is key.
3. Adding Wet Ingredients: Next, drizzle in the vegetable oil and vanilla extract. Continue to fold until just combined. The oil helps to keep the cake moist, while the vanilla adds a depth of flavor that elevates the chocolate.
Baking Time and Temperature
Pour the batter into the prepared jelly roll pan, spreading it evenly to ensure uniform baking. Bake in the preheated oven for approximately 12-15 minutes or until the cake springs back when lightly touched. Keep an eye on the cake to prevent overbaking, as a dry cake can crack when rolled.
Cooling and Rolling the Cake
Once the cake is baked, it’s time to move on to the cooling and rolling process, which is crucial to achieving that perfect roll without cracks.
Technique for Rolling
1. Rolling the Cake While Warm: As soon as you remove the cake from the oven, place a clean kitchen towel on a flat surface and dust it lightly with powdered sugar. This will prevent the cake from sticking to the towel. Carefully invert the cake onto the towel, peeling off the parchment paper. While the cake is still warm, start rolling it from one end, using the towel to help guide the process. Rolling the cake while it is warm helps to prevent cracking, ensuring that your final product looks as good as it tastes.
2. Cooling Process: Once the cake is rolled, place it seam-side down on a wire rack to cool completely. This cooling period is essential, as it allows the cake to set and hold its shape once unrolled. It also makes it easier to spread the peanut butter filling later on.
Tips for Easing the Rolling Process
As you roll the cake, remember to keep the pressure gentle yet firm. If you find the cake resisting, don’t force it—this can lead to cracks. Instead, gently coax it along, and if necessary, use a little more powdered sugar on the towel to ease the process. Once the cake has cooled, it will be ready for the next exciting step in this delicious journey.
Creating the Peanut Butter Filling
With the cake base prepared and cooled, it’s time to turn our attention to the peanut butter filling that will bring this dessert to life.
Making the Peanut Butter Filling
1. Mixing the Ingredients: In a mixing bowl, combine creamy peanut butter, powdered sugar, and heavy cream. Using an electric mixer, beat the mixture until it is smooth and fluffy. The heavy cream plays a crucial role here, adding a light and airy texture to the filling that perfectly balances the dense chocolate cake.
2. Texture and Flavor Balance: It’s essential to taste the filling as you go. You want a filling that is rich and flavorful, but not overwhelmingly sweet. If you find it too sweet, consider adding a pinch of salt to enhance the peanut butter flavor and balance out the sweetness.
Spreading the Filling Evenly
Once the filling is ready, carefully unroll the cooled cake. Spread the peanut butter filling evenly over the surface, leaving a small border around the edges. This border is important, as it will help to prevent the filling from spilling out when the cake is rolled back up. The goal is to achieve a consistent flavor in every slice, so take your time to ensure even coverage.
Assembling the Roll Cake
With both the cake base and filling prepared, we are now on the brink of assembling our Reese’s Peanut Butter Cup Roll Cake. This final step is where all the components come together, resulting in a dessert that is as visually stunning as it is delicious.
Stay tuned for the next part of the article, where we will cover the assembly of the roll cake and the final touches that will make this dessert truly unforgettable!

Unrolling and Filling the Cake
Once your chocolate cake has finished baking and has cooled slightly, it’s time to unroll and fill it. Begin by carefully peeling back the parchment paper from one end of the cake. This step is crucial; if the parchment sticks, gently use a spatula to release it from the cake’s surface.
With the parchment removed, spread a generous layer of peanut butter filling across the surface of the cake, leaving a small border (about half an inch) around the edges. This border is essential for preventing the filling from oozing out when you roll the cake back up. Ensure that the filling is spread evenly to provide a consistent flavor in every bite.
Rolling the Cake Back Up
Now comes the exciting part: rolling the cake back up! Starting from the edge where you peeled back the parchment paper, carefully lift the cake and begin to roll it tightly. As you roll, use your hands to maintain even pressure. It’s important to roll it as tightly as possible without cracking the cake.
Once you’ve rolled the cake into a log shape, you will notice that it may want to unroll. To keep it secure, place it seam-side down on a serving platter. This will conceal the seam and provide a cleaner presentation. If you’re concerned about the integrity of your roll, you can wrap it in plastic wrap and refrigerate it for about 30 minutes. This helps the cake hold its shape and makes slicing easier later on.
Presentation Options
When it comes to the presentation of your Reese’s Peanut Butter Cup Roll Cake, the possibilities are endless. You can serve it as is, or you can slice it into generous rounds to showcase the beautiful swirls of chocolate and peanut butter.
For a more elegant touch, consider garnishing the cake with a drizzle of chocolate ganache. To add flair, you can also sprinkle chopped Reese’s cups or crushed peanuts over the top. Not only do these garnishes enhance the visual appeal, but they also provide additional texture and flavor, making each slice even more indulgent.
Making the Chocolate Ganache
To elevate your roll cake, a rich chocolate ganache is the perfect finishing touch. Begin by finely chopping high-quality semisweet or dark chocolate and placing it in a heatproof bowl.
In a small saucepan, heat heavy cream over medium heat until it begins to simmer—do not let it boil. Once it’s simmering, pour the hot cream over the chopped chocolate. Let it sit for about five minutes; this waiting period allows the chocolate to soften. Then, using a whisk, gently stir the mixture until it is smooth and glossy. If you find the ganache too thick, you can adjust it by adding a bit more warm cream until you reach your desired consistency.
The interplay of chocolate and cream in ganache not only adds a luxurious finish but also enhances the overall flavor profile of the dessert. If you’re feeling adventurous, consider flavoring your ganache with a splash of vanilla extract or even a hint of sea salt for a delightful contrast. For those who enjoy alternative toppings, consider using a simple whipped cream or a layer of chocolate mousse to complement the cake’s rich flavors.
Garnishing the Cake
Garnishing your Reese’s Peanut Butter Cup Roll Cake can elevate its presentation and taste. Start by drizzling the prepared chocolate ganache over the top, letting it cascade down the sides for a dramatic effect.
Next, sprinkle chopped Reese’s cups on top for a touch of color and crunch. For an added layer of flavor, consider crushing some peanuts and dusting them over the cake. This not only enhances the visual appeal but also contributes to the dessert’s texture, giving a satisfying crunch alongside the creamy filling.
When choosing garnishes, consider personal preferences and dietary needs. For a nut-free option, simply skip the crushed peanuts or replace them with a sprinkle of toasted coconut for a different flavor. If you want to keep it decadent but lighter, opt for a dollop of whipped cream or a scoop of vanilla ice cream on the side.
Serving Suggestions
The Reese’s Peanut Butter Cup Roll Cake is a versatile dessert, perfect for various occasions, from birthday parties to holiday celebrations or even casual family gatherings. Its impressive appearance and delightful flavor make it a crowd-pleaser that will leave your guests raving.
When serving, consider pairing the cake with complementary beverages such as a rich cup of coffee, a glass of cold milk, or even a sweet dessert wine. These beverages enhance the chocolate and peanut butter flavors, making for an indulgent experience.
For those with dietary restrictions, this roll cake can be adapted in several ways. Gluten-free cake mixes are widely available and can easily replace standard flour in the recipe. Additionally, you can explore using natural peanut butter for a healthier filling, or alternative sweeteners to cater to different dietary needs.
Nutritional Information
While indulging in a slice of this delectable roll cake, it’s important to be mindful of its nutritional aspects. Each slice of the Reese’s Peanut Butter Cup Roll Cake contains approximately 350-400 calories, depending on the thickness of the slices and the quantity of ganache used. The key ingredients—flour, sugar, chocolate, and peanut butter—contribute to the dessert’s rich flavor but also pack in sugars and fats.
Moderation is crucial when enjoying indulgent desserts like this roll cake. Savoring a slice as part of a balanced diet can satisfy your sweet tooth without compromising your health goals. Additionally, be aware of potential allergens such as peanuts, dairy, and gluten, especially when serving guests with allergies.
Conclusion
Making and enjoying the Reese’s Peanut Butter Cup Roll Cake is a delightful experience that combines the richness of chocolate with the creaminess of peanut butter. This dessert not only serves as a unique twist on traditional chocolate cakes but also stands out as a crowd-pleaser at any gathering.
Whether you’re celebrating a special occasion or simply treating yourself, this roll cake promises to bring joy and satisfaction with every bite. We encourage you to try this recipe and discover the happiness it can bring to your gatherings and celebrations. Your friends and family will surely appreciate the effort, and the deliciousness of this dessert will make it a favorite for years to come.