

Introduction to Sourdough Delight: Herb Infused Focaccia
There’s something undeniably magical about the process of baking bread at home, especially when it comes to the art of sourdough. Today, we’re diving into a strikingly delicious recipe: Sourdough Delight: Herb Infused Focaccia. This delightful bread not only showcases the unique tang of sourdough but also highlights the aromatic qualities of fresh herbs, making it a feast for the senses. Whether you’re a seasoned baker or a beginner looking to elevate your kitchen skills, this focaccia recipe is designed to inspire and guide you through the enchanting world of sourdough baking.
Focaccia, with its golden crust and soft, chewy interior, is a traditional Italian flatbread that can be enjoyed in myriad ways. Serve it warm as an appetizer, pair it with soups and salads, or even enjoy it on its own with a drizzle of olive oil and a sprinkle of sea salt. The versatility of focaccia makes it a perfect addition to any meal, and this herb-infused version takes it to the next level, providing an aromatic experience that will leave your guests asking for seconds.
In this article, we’ll not only share the step-by-step process of making this delicious focaccia but also explore the fascinating world of sourdough, its health benefits, and the essential ingredients that bring this recipe to life. So, roll up your sleeves, gather your ingredients, and let’s embark on this flavorful journey together!
Understanding Sourdough and Its Benefits
Exploring the Basics of Sourdough
To truly appreciate the art of making sourdough focaccia, it’s essential to understand what sourdough is and the history behind this age-old baking method. Sourdough bread is made through a natural fermentation process that utilizes wild yeast and lactic acid bacteria present in the environment. This fermentation process not only gives sourdough its signature tangy flavor but also contributes to its unique texture and crusty exterior.
The history of sourdough dates back thousands of years, with evidence of its existence as far back as ancient Egypt. Sourdough was the primary way of leavening bread until the advent of commercial yeast in the 19th century. Today, however, many home bakers are rediscovering the joys and benefits of sourdough, embracing the slow fermentation process that results in a more complex flavor profile and improved digestibility.
Nutritional Benefits of Sourdough Bread
One of the most compelling reasons to bake with sourdough is its numerous health benefits. The fermentation process breaks down gluten, making it easier to digest for many individuals who might otherwise have difficulty with traditional bread. Additionally, the presence of beneficial bacteria in sourdough can help promote gut health. The longer fermentation time also leads to lower levels of phytic acid, which can inhibit nutrient absorption, making sourdough a more nutritious option.
As we continue to explore the world of sourdough, let’s take a closer look at the crucial component that makes this all possible: the sourdough starter.
The Role of Sourdough Starter
A sourdough starter is a mixture of flour and water that has been fermented over time to cultivate wild yeast and bacteria. This living culture is the heart of sourdough baking, providing the leavening needed to make bread rise. Maintaining a healthy starter is vital for successful sourdough bread, and it requires regular feeding to keep the yeast active and bubbly.
How to Maintain an Active and Bubbly Starter
To create and maintain an active sourdough starter, begin by combining equal parts flour and water in a jar, mixing well to incorporate air. Store the jar at room temperature and feed it with fresh flour and water every 12 to 24 hours. The consistency should be similar to thick pancake batter. After several days, you should notice bubbles forming and the mixture will begin to rise, indicating that the yeast is alive and thriving.
Signs of a Healthy Starter
A healthy sourdough starter will have a pleasant, slightly tangy aroma and will double in size within a few hours of feeding. Look for bubbles on the surface and the edges of the jar, which are signs of active fermentation. If your starter is sluggish or has a sour smell that is overpoweringly pungent, it may need more frequent feedings or a change in its temperature or flour type.
Now that we’ve covered the foundational aspects of sourdough, let’s shift our focus to the ingredients needed to create our herb-infused focaccia.
Ingredients Breakdown for Herb Infused Focaccia
Essential Ingredients for Your Focaccia
Making a perfect focaccia starts with selecting the right ingredients. Below, we break down the essential components that will contribute to the flavor, texture, and overall success of your herb-infused focaccia.
– All-Purpose Flour: This is the primary flour used in focaccia and is crucial for achieving the desired structure and chewiness. All-purpose flour contains a moderate amount of protein, which helps create gluten, giving the focaccia its rise and texture. While you can experiment with bread flour for a chewier result, all-purpose flour is typically the go-to for focaccia.
– Active Sourdough Starter: The heart of our focaccia, the sourdough starter, is what provides the necessary leavening and flavor. Ensure your starter is active and bubbly before you begin the recipe for the best results.
– Warm Water: Water plays a vital role in activating the yeast and hydrating the flour. Using warm water (around 75°F to 80°F) helps to create an ideal environment for fermentation. Be cautious not to use water that is too hot, as it can kill the yeast.
Infusing Flavor with Herbs
The magic of this herb-infused focaccia comes from the addition of fresh herbs, which not only enhance the flavor but also fill your kitchen with an inviting aroma while baking.
– Fresh Herbs vs. Dried Herbs: While dried herbs can be used, fresh herbs provide a more vibrant flavor and aroma. Fresh herbs also have essential oils that are released during cooking, enriching the bread’s flavor profile.
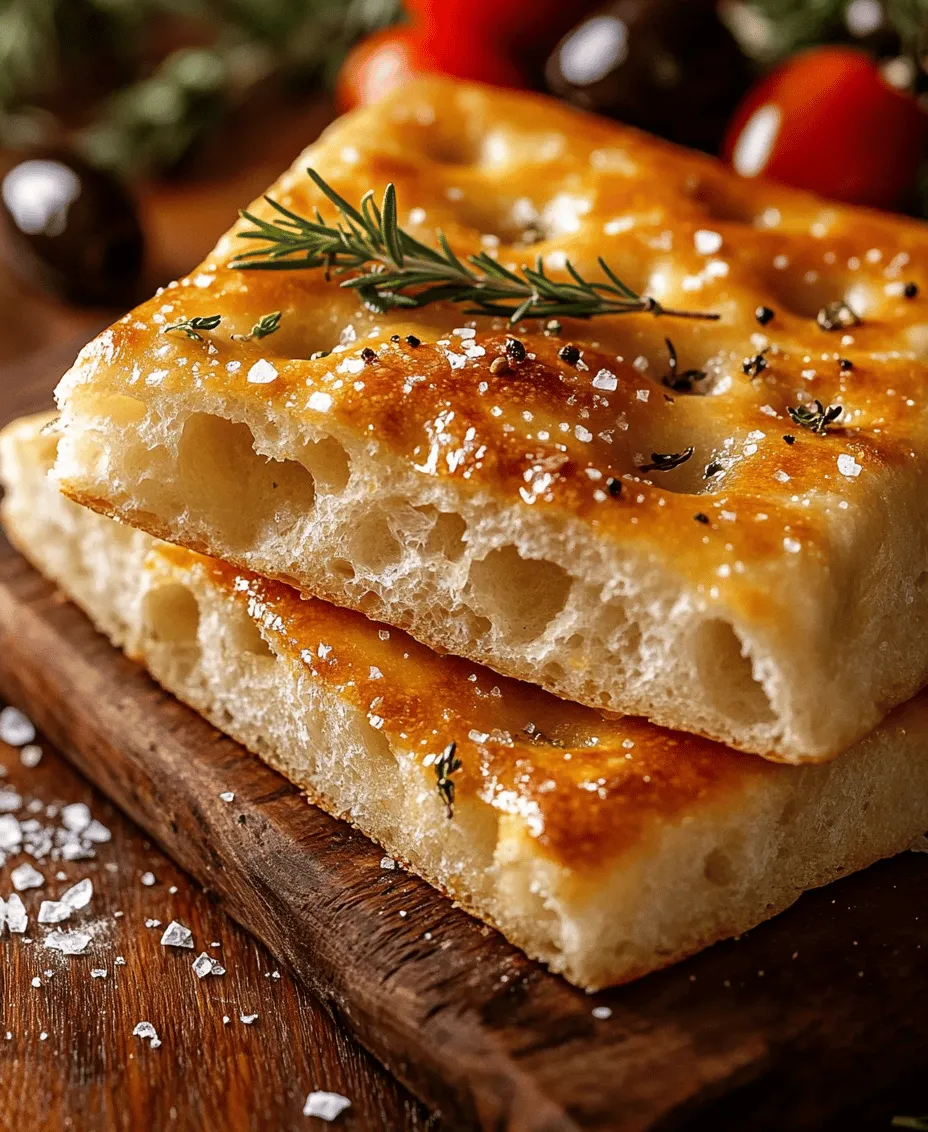
– Spotlight on Rosemary and Thyme: Rosemary and thyme are classic choices for focaccia. Rosemary adds a robust, piney flavor, while thyme contributes a subtle earthiness. Together, they create a harmonious blend that elevates the focaccia to new heights.
– Optional Ingredients: Feel free to get creative with additional toppings! Consider adding olives, cherry tomatoes, or caramelized onions for extra texture and flavor. A sprinkle of sea salt or a drizzle of olive oil before baking can also enhance the overall taste.
With a clear understanding of the ingredients, we are now ready to dive into the step-by-step instructions for crafting this delightful focaccia.
Step-by-Step Instructions for Crafting Focaccia
Activating the Sourdough Starter
Before diving into making your focaccia, it’s crucial to ensure that your sourdough starter is active and ready to work its magic. Here’s how to prepare your starter for the baking process:
1. Feed Your Starter: If your starter has been kept in the refrigerator, take it out and feed it at least 4-6 hours before you plan to start making your focaccia. Mix equal parts of flour and water (for example, 50g of each) into your starter and stir until combined. Allow it to sit at room temperature.
2. Observe the Bubbles: After a few hours, check your starter. It should have doubled in size and developed a bubbly, airy texture. This indicates that the yeast is active and ready to be used.
3. Timing Tips: If your kitchen is cool, consider placing the starter in a slightly warmer area to encourage fermentation. Conversely, if your kitchen is too warm, it might ferment too quickly; you want a balanced environment for optimal results.
Mixing the Dough
Once your starter is active, it’s time to mix the dough. This is where the magic happens, transforming simple ingredients into a flavorful focaccia.
1. Combine Ingredients: In a large mixing bowl, combine 500g of all-purpose flour, 350g of warm water, and 200g of active sourdough starter. Mix with a wooden spoon or your hands until a shaggy dough forms.
2. Autolyse Phase: Allow the dough to rest for 30 minutes. This autolyse stage allows the flour to hydrate fully and begin gluten development, which will lead to a better texture in the finished bread.
3. Add Salt and Herbs: After the autolyse, sprinkle 10g of salt over the dough along with the finely chopped fresh herbs (about 2 tablespoons of rosemary and 1 tablespoon of thyme). Use your hands to gently fold the salt and herbs into the dough until evenly distributed.
This is just the beginning of your focaccia journey. In the upcoming sections, we will guide you through the crucial steps of fermenting, shaping, and baking your herb-infused focaccia to perfection!
Techniques for Achieving the Perfect Wet Dough Consistency
When making focaccia, achieving the right wet dough consistency is crucial for the final texture of your bread. Unlike traditional bread recipes that may call for a firmer dough, focaccia benefits from a wetter mixture. A wet dough promotes an open crumb structure, resulting in a light and airy texture. Here are some techniques to help you achieve that perfect wet dough:
1. Measure Accurately: Use a kitchen scale to measure your flour and water. The hydration level (the ratio of water to flour) is essential, and a standard focaccia recipe typically has a hydration level of around 70-80%.
2. Use High-Quality Flour: Opt for bread flour or all-purpose flour with a higher protein content. This will provide the necessary gluten strength to hold the dough together while still allowing for a high hydration level.
3. Incorporate Water Gradually: When mixing the dough, add water gradually to allow the flour to absorb it fully. This will help you gauge the dough’s consistency more accurately. If the dough feels too sticky, you can add a little flour, but be cautious not to overdo it.
4. Kneading Method: Instead of traditional kneading, consider using the “stretch and fold” technique. This method allows you to develop gluten structure without incorporating too much flour, maintaining the wetness of the dough.
5. Hydration Adjustments: If you’re new to working with wet doughs, start at the lower end of the hydration scale. As you become more comfortable, adjust the water content to achieve your preferred consistency.
Importance of Mixing Thoroughly to Incorporate Ingredients
Proper mixing is vital in any bread-making process, but it’s particularly important when working with wet dough. Thorough mixing ensures that all ingredients are well incorporated, which is essential for even fermentation and flavor development. Here are some key points to consider:
– Even Distribution: Ensure that the salt, herbs, and sourdough starter are evenly distributed throughout the dough. This will lead to a consistent flavor profile in every bite.
– Avoid Over-Mixing: While thorough mixing is important, be cautious not to over-mix the dough. Over-mixing can lead to excessive gluten development, which may result in a tough texture rather than the desired lightness.
– Use a Dough Scraper: A plastic dough scraper can assist in folding and incorporating ingredients without the need for excessive hand mixing, which can be messy with wet dough.
Bulk Fermentation Process
Understanding Bulk Fermentation and Its Role in Flavor Development
Bulk fermentation is the first rise of the dough after mixing, and it plays a crucial role in flavor development. During this phase, the yeast in the sourdough starter begins to ferment the sugars in the flour, producing carbon dioxide and organic acids that contribute to the bread’s flavor.
– Flavor Complexity: The longer the bulk fermentation (within reason), the more complex the flavor. This is particularly true for sourdough, where the natural fermentation process enhances the tanginess and depth.
– Texture Development: Aside from flavor, bulk fermentation helps with the development of gluten, which gives the dough its structure. This process allows gases to be trapped within the dough, contributing to an airy texture.
Ideal Conditions for Fermentation: Temperature and Time
The ideal conditions for bulk fermentation are typically around room temperature, about 75°F to 80°F (24°C to 27°C). However, if your kitchen is cooler, you may need to extend the fermentation time.
– Timeframe: Bulk fermentation usually takes about 4 to 6 hours, depending on the ambient temperature and the strength of your sourdough starter. Look for the dough to approximately double in size and exhibit bubbles forming on the surface.
– Monitoring: Keep an eye on the dough to gauge when it’s ready. You want it to feel puffy and aerated, indicating active fermentation.
Shaping and Preparing for the Second Rise
Tips for Shaping the Dough into the Perfect Rectangle
Once bulk fermentation is complete, it’s time to shape your dough. Focaccia is traditionally shaped into a rectangle, which makes it ideal for baking in a standard baking sheet or pan.
1. Flour Your Surface: Lightly flour your work surface to prevent sticking. Remember, the dough will be wet, so a little flour helps manage it.
2. Gentle Handling: Use your fingertips to gently stretch the dough into a rectangle. Avoid using a rolling pin, as this can deflate the dough and ruin the airy structure.
3. Square Corners: Aim for straight edges and square corners. This will help ensure even baking and a uniform appearance.
Techniques for Managing Dough Elasticity During Shaping
Wet dough can be more elastic, making it challenging to shape. Here are some techniques to manage this:
– Rest Periods: If the dough is too elastic and difficult to shape, give it a short rest (about 10-15 minutes) before attempting to shape it again. This allows the gluten to relax.
– Stretch and Fold: Use the stretch and fold technique during shaping. Gently stretch one edge of the dough and fold it over itself, repeating this process on all sides. This will help with both shaping and gluten development.
Creating Deep Dimples and Adding Toppings
The Art of Dimpling: Technique and Purpose
Dimpling focaccia is not only a traditional practice but also serves a functional purpose. The deep dimples create pockets for toppings and help capture olive oil, leading to a beautifully textured crust.
1. Use Your Fingers: After shaping the dough, use your fingertips to press into the surface, creating deep dimples without tearing the dough.
2. Spacing: Space the dimples evenly across the surface to ensure even oil distribution and topping placement.
3. Avoid Puncturing: Be careful not to puncture through the bottom of the dough, as this will allow gases to escape during baking.
Suggestions for Creative Toppings: Tomatoes, Olives, and Garlic
Focaccia is a versatile bread that can be topped with a variety of ingredients to enhance its flavor. Here are some creative topping ideas:
– Herbs: Fresh herbs such as rosemary, thyme, or oregano can be sprinkled on top before baking for an aromatic touch.
– Vegetables: Add slices of ripe tomatoes, Kalamata olives, or roasted garlic cloves. These toppings not only add flavor but also create an attractive presentation.
– Cheese: For a decadent touch, sprinkle shredded cheese (like mozzarella or Parmesan) over the focaccia before baking.
– Sea Salt: A generous sprinkle of coarse sea salt just before baking elevates the flavor and creates a delightful crust.
Baking the Focaccia to Perfection
Preheating the Oven
Preheating your oven is essential for achieving the best results when baking focaccia. A properly preheated oven ensures that the bread rises correctly and develops a crispy crust.
1. Temperature Setting: Preheat your oven to 425°F (220°C). This high temperature is critical for creating a golden, crispy exterior while keeping the inside tender.
2. Use a Baking Stone: If you have a baking stone, place it in the oven while preheating. This will help retain heat and create a more even bake.
Baking: Timing and Visual Cues
Knowing when your focaccia is ready to come out of the oven is key to achieving that perfect golden brown finish.
1. Baking Time: Bake the focaccia for about 20-25 minutes. Keep an eye on it towards the end of the baking time.
2. Visual Cues: Look for a beautifully golden-brown crust and an audible crunch when you tap the bottom of the bread. If it sounds hollow, it’s likely ready to come out of the oven.
3. Crispy Edges: The edges of the focaccia should be crispy, while the center remains soft and airy.
Cooling and Serving Suggestions for Focaccia
Cooling the Focaccia
After removing the focaccia from the oven, proper cooling is essential to maintain its texture.
1. Cooling Rack: Transfer the focaccia to a wire cooling rack to allow air circulation. This prevents the bottom from becoming soggy.
2. Avoid Covering: Resist the temptation to cover the focaccia while it cools, as this can trap moisture and lead to a loss of crispness.
Serving Ideas and Pairings
Focaccia is a delightful addition to any meal, and there are numerous ways to serve it:
– Dipping Oils: Serve warm focaccia with a side of olive oil for dipping, perhaps infused with balsamic vinegar or herbs for added flavor.
– Accompaniments: Pair focaccia with soups, salads, or as a side to pasta dishes. It can also be used as a base for sandwiches.
– Creative Leftover Uses: If you have leftover focaccia, consider using it in a panzanella salad, or cubes can be toasted and added to soups for added texture.
Conclusion: The Joy of Baking Sourdough Focaccia
Baking Sourdough Delight: Herb Infused Focaccia is not merely about creating a delectable bread; it’s a journey that combines art, science, and a bit of love. As you embrace the process of making this focaccia, you’ll find joy in each step, from mixing the ingredients to watching it rise and finally savoring the warm, fragrant bread fresh from your oven.
This recipe invites you to explore the beauty of sourdough and the satisfaction of crafting something truly special. Whether enjoyed with a meal, served at gatherings, or simply as a treat for yourself, this focaccia will undoubtedly earn its place among your favorite recipes. Celebrate the joy of baking and relish the rich flavors that you create in your kitchen today.