
Introduction
If you’re on the lookout for a dessert that beautifully marries nostalgia with a modern twist, look no further than our Banana Pudding Cheesecake Cones. This delightful recipe captures the creamy richness of cheesecake while evoking the familiar, comforting flavors of classic banana pudding, all presented in a fun and portable cone format. Whether you’re hosting a gathering, celebrating a birthday, or simply indulging in a sweet treat at home, these cones are sure to be a hit among both kids and adults alike.
The appeal of Banana Pudding Cheesecake Cones lies not only in their taste but also in their versatility. They can be customized to suit various occasions, from casual family dinners to elegant parties. The combination of creamy cheesecake filling, ripe bananas, and crunchy vanilla wafer crust creates a delightful contrast that keeps everyone coming back for more. In this article, we will explore the recipe details, ingredient benefits, preparation steps, and serving suggestions to help you whip up these delectable cones effortlessly.
Understanding the Ingredients
To create the perfect Banana Pudding Cheesecake Cones, it’s important to understand the key ingredients that contribute to their rich flavor and texture. Each component plays a vital role in crafting this dessert, ensuring that every bite is a harmonious blend of flavors.
Vanilla Wafer Cookies
Vanilla wafer cookies serve as the foundation of our dessert, providing both crunch and flavor. These small, crisp cookies are typically made with vanilla, giving them a sweet, buttery taste that perfectly complements the creamy filling of the cheesecake. The importance of these cookies in creating a flavorful crust cannot be overstated; they add texture and enhance the overall taste of the dessert.
From a nutritional standpoint, vanilla wafers are relatively light compared to other cookie varieties. They often contain less fat and fewer calories, making them a better choice for a dessert crust. However, it’s essential to keep portion sizes in mind. When combined with other ingredients, they create a satisfying crunch without overwhelming the dish with excessive sweetness.
Cream Cheese
The heart of our cheesecake filling is cream cheese. This ingredient is crucial for achieving the smooth, creamy texture that cheesecakes are known for. Cream cheese adds a rich flavor while providing a delightful mouthfeel that complements the sweetness of the bananas and the crunch of the wafer crust.
In addition to its texture-enhancing properties, cream cheese also offers health benefits. It is a good source of protein and calcium, which are essential for maintaining healthy bones and muscles. For those looking for a lighter version, alternatives such as Neufchâtel cheese or Greek yogurt can be used, providing similar creaminess with reduced fat content.
Heavy Whipping Cream
Heavy whipping cream is another essential ingredient in our Banana Pudding Cheesecake Cones. It plays a pivotal role in creating a light and airy texture for the cheesecake filling. When whipped, heavy cream adds volume and stability, ensuring that the filling holds its shape when piped into the cones.
Nutritionally, heavy cream is rich in fat, which contributes to its luxurious mouthfeel. If you’re looking for a lighter alternative, you can use half-and-half or a non-dairy whipped topping, but keep in mind that these substitutes may alter the final texture of the dessert.
Bananas
Ripe bananas are the star of this recipe, lending natural sweetness and flavor to the cheesecake filling. They not only enhance the taste but also add moisture, making the dessert extra creamy. When selecting bananas, look for ones that are just ripe—these will have a hint of green and are not overly soft. Overripe bananas can result in an overly mushy texture, which may not hold up well in the cones.
Nutritionally, bananas are a powerhouse of vitamins and minerals, particularly potassium, which is vital for heart health and proper muscle function. They also provide dietary fiber, contributing to digestive health. Incorporating fresh bananas into your dessert not only elevates the flavor but also adds nutritional value.
Powdered Sugar and Vanilla Extract
To achieve the perfect balance of sweetness and flavor, powdered sugar and vanilla extract are added to the cheesecake filling. Powdered sugar, with its fine texture, blends seamlessly into the cream cheese mixture, ensuring a smooth consistency without any graininess. It also provides the necessary sweetness without being overpowering.
When it comes to vanilla extract, opting for pure vanilla extract over imitation can significantly enhance the flavor profile of your dessert. Pure vanilla extract, derived from real vanilla beans, offers a rich, complex flavor that elevates the entire dish. Imagination is also an option, but the difference in flavor quality is notable.
Preparing the Cone Base
Creating a solid foundation for your Banana Pudding Cheesecake Cones begins with the cone base. This step is crucial for ensuring that the dessert maintains its shape and provides the perfect crunch with each bite. Below is a step-by-step guide to preparing the cone base.
Mixing the Crust
1. Start by melting the butter: Begin by melting unsalted butter in a microwave-safe bowl or on the stove. You want it to be completely melted but not bubbling.
2. Crush the vanilla wafers: While the butter is melting, take your vanilla wafer cookies and crush them into fine crumbs. You can use a food processor for a quick and uniform texture or place them in a resealable plastic bag and crush them with a rolling pin.
3. Combine the melted butter and crushed wafers: In a mixing bowl, combine the crushed vanilla wafers with the melted butter. Mix them thoroughly until the butter is evenly distributed throughout the crumbs. The mixture should resemble wet sand and hold together when pressed.
4. Add a pinch of salt (optional): For an enhanced flavor profile, consider adding a pinch of salt to the mixture. This will help to balance the sweetness of the dessert and elevate the overall taste.
Pressing the Mixture
1. Prepare your cone molds: If you have cone molds, make sure they are clean and ready to use. If not, you can also use sturdy paper ice cream cones.
2. Press the mixture into the molds: Take small amounts of the crust mixture and press it firmly into the bottom of your molds or cones. Use the back of a spoon or your fingers to ensure it is tightly packed. The goal is to create a solid base that won’t crumble when filled.
3. Build the sides: After establishing the base, continue pressing the mixture up the sides of the mold. Aim for an even layer that extends about halfway up the cone. This will provide structural integrity and a satisfying crunch with every bite.
4. Chill the crust: Once all molds are filled, place them in the refrigerator for at least 30 minutes. This chilling time allows the butter to solidify, helping the crust to hold its shape when you add the cheesecake filling.
With your cone bases prepared, you’re well on your way to crafting these delightful Banana Pudding Cheesecake Cones. Stay tuned for the next steps, where we’ll dive into creating the luscious cheesecake filling and assembling your scrumptious dessert.
Suggestions for Alternative Cone Bases
While traditional waffle cones are a classic choice for serving your Banana Pudding Cheesecake, there are numerous alternative cone bases that can add a unique twist to this delightful dessert. Consider using sugar cones, which offer a sweeter flavor and a sturdier structure. For a more indulgent option, chocolate-dipped cones can enhance the dessert’s richness. If you prefer a gluten-free alternative, look for cones made from almond flour or other gluten-free ingredients, ensuring everyone can enjoy this treat. Finally, for a more tropical flair, consider using coconut-flavored cones to complement the banana flavor, creating a delightful pairing that transports your taste buds to the beach.
Crafting the Cheesecake Filling
The cheesecake filling is the heart of your Banana Pudding Cheesecake Cones, and crafting it correctly will ensure a delectable dessert that captivates your guests. Here’s how to create a luscious cheesecake filling that’s creamy and rich.
Mixing Ingredients
1. Beat the Cream Cheese: Start with 16 ounces of softened cream cheese. Place it in a large mixing bowl and use an electric mixer on medium speed to beat the cream cheese until it’s smooth and creamy. This should take about 2-3 minutes. The key here is to ensure that there are no lumps, as this will affect the overall texture of your cheesecake filling.
2. Incorporate Powdered Sugar: Gradually add 1 cup of powdered sugar to the cream cheese while continuing to beat on low speed. Mixing it in gradually prevents sugar clouds from forming. Once added, increase the speed again, mixing until fully combined and smooth.
3. Add Vanilla Extract: Pour in 1 teaspoon of pure vanilla extract for flavor. Mix for an additional 30 seconds to incorporate the vanilla thoroughly. The aroma of vanilla will enhance the overall taste of your cheesecake filling.
4. Achieving Smooth Consistency: The mixture should be velvety and free of any lumps. If you notice any remaining lumps, continue to beat the mixture for a minute longer. A smooth consistency is crucial for a creamy filling that will easily blend with the other layers.
Whipping the Cream
Whipping cream adds lightness and volume to your cheesecake filling. Here’s how to whip it to perfection:
1. Chill Your Equipment: Before whipping the cream, chill your mixing bowl and beaters in the freezer for about 15 minutes. Cold equipment helps the cream whip faster and achieve stiff peaks.
2. Whip the Heavy Cream: Pour 1 cup of heavy cream into the chilled mixing bowl. Begin beating on low speed, gradually increasing to medium-high. Whip until soft peaks form, which should take about 3-5 minutes. Be cautious not to overwhip, as this can turn the cream into butter.
3. Folding Techniques: Once you achieve stiff peaks, it’s time to fold the whipped cream into your cheesecake mixture. Use a rubber spatula to gently fold one-third of the whipped cream into the cheesecake mixture. This lightens the mixture. Continue folding in the remaining whipped cream in two more additions, being careful to maintain the airiness of the whipped cream. The goal is to keep the filling light and fluffy.
Layering the Cones
Assembling your Banana Pudding Cheesecake Cones is where the fun begins. This step allows for creativity and ensures that each cone is filled with a delightful combination of flavors.
Layering Process
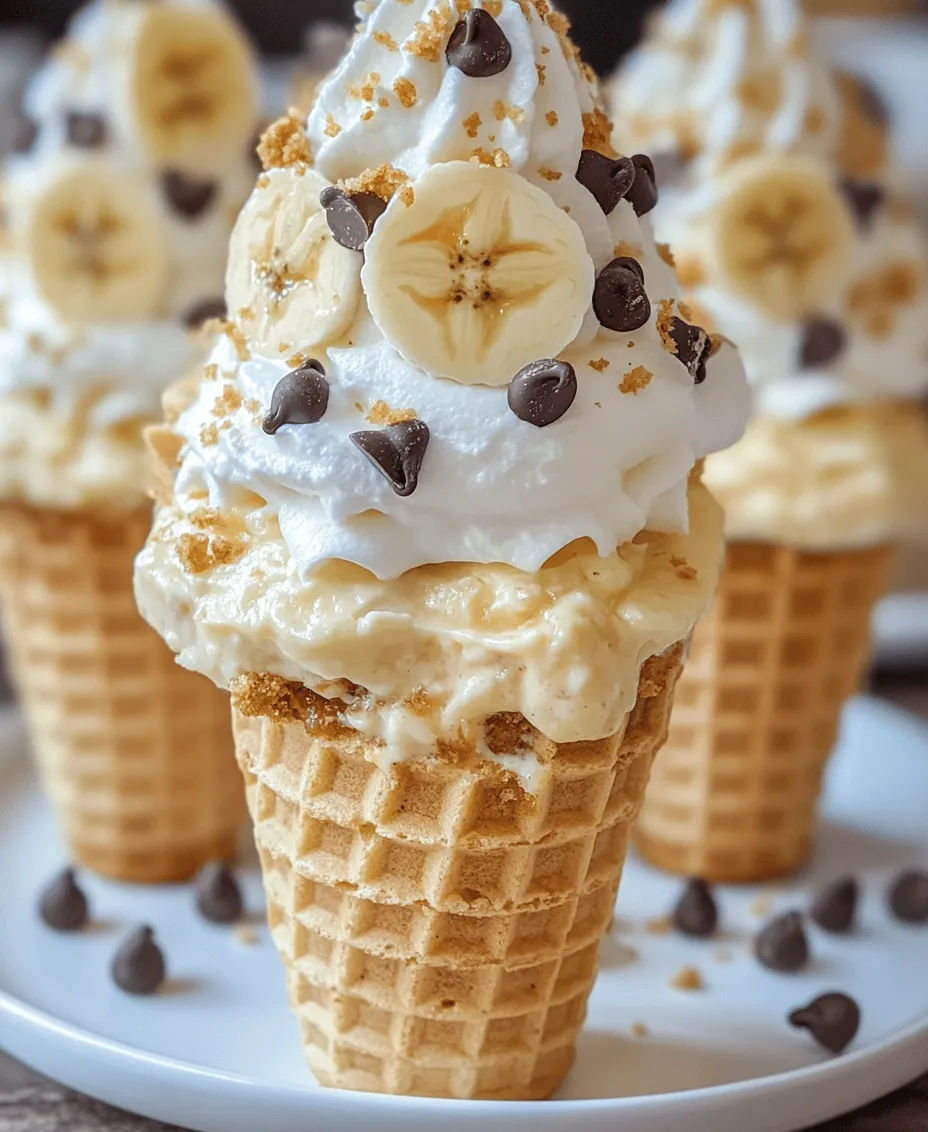
1. Fill the Cones: Start by using a piping bag fitted with a large round tip or simply a ziplock bag with a corner snipped off. Begin by piping a layer of the cheesecake filling into the bottom of each cone. Aim for approximately 1-2 tablespoons, depending on the size of your cones.
2. Add Sliced Bananas: Next, place a layer of sliced bananas over the cheesecake filling. Use ripe bananas for the best flavor, and aim for 3-4 slices per cone. The bananas will add moisture and natural sweetness, enhancing the overall flavor profile.
3. Incorporate Pudding: Spoon or pipe a layer of banana pudding over the bananas. This will work to bind the layers together while adding a creamy texture. Alternate the layers of cheesecake filling, bananas, and pudding until you reach the top of the cone, leaving a little space for the final touches.
4. Visual Presentation: For an aesthetically pleasing presentation, try to alternate the layers evenly, creating a beautiful marbling effect. This not only looks appealing but also ensures a balance of flavors with each bite.
5. Ensure Even Distribution: To guarantee each cone has an even distribution of ingredients, use a small spoon or a piping bag for precise layering. This attention to detail will elevate the overall dining experience.
Chilling the Cones
Once you’ve layered your cones, chilling is a crucial step that enhances the flavors and textures.
Setting Time
1. Importance of Chilling: Chilling allows the layers to meld together, ensuring that the flavors become more pronounced and the dessert develops a creamy consistency. The chilling process also helps the cones maintain their structural integrity, preventing them from becoming soggy.
2. Recommended Chilling Time: Ideally, you should chill the assembled cones for at least 1-2 hours in the refrigerator. If you’re short on time, you can chill them for as little as 30 minutes. Just be aware that the flavors may not meld as beautifully in a shorter timeframe.
Serving Suggestions
When it comes time to serve your Banana Pudding Cheesecake Cones, presentation is key to impressing your guests.
Topping Options
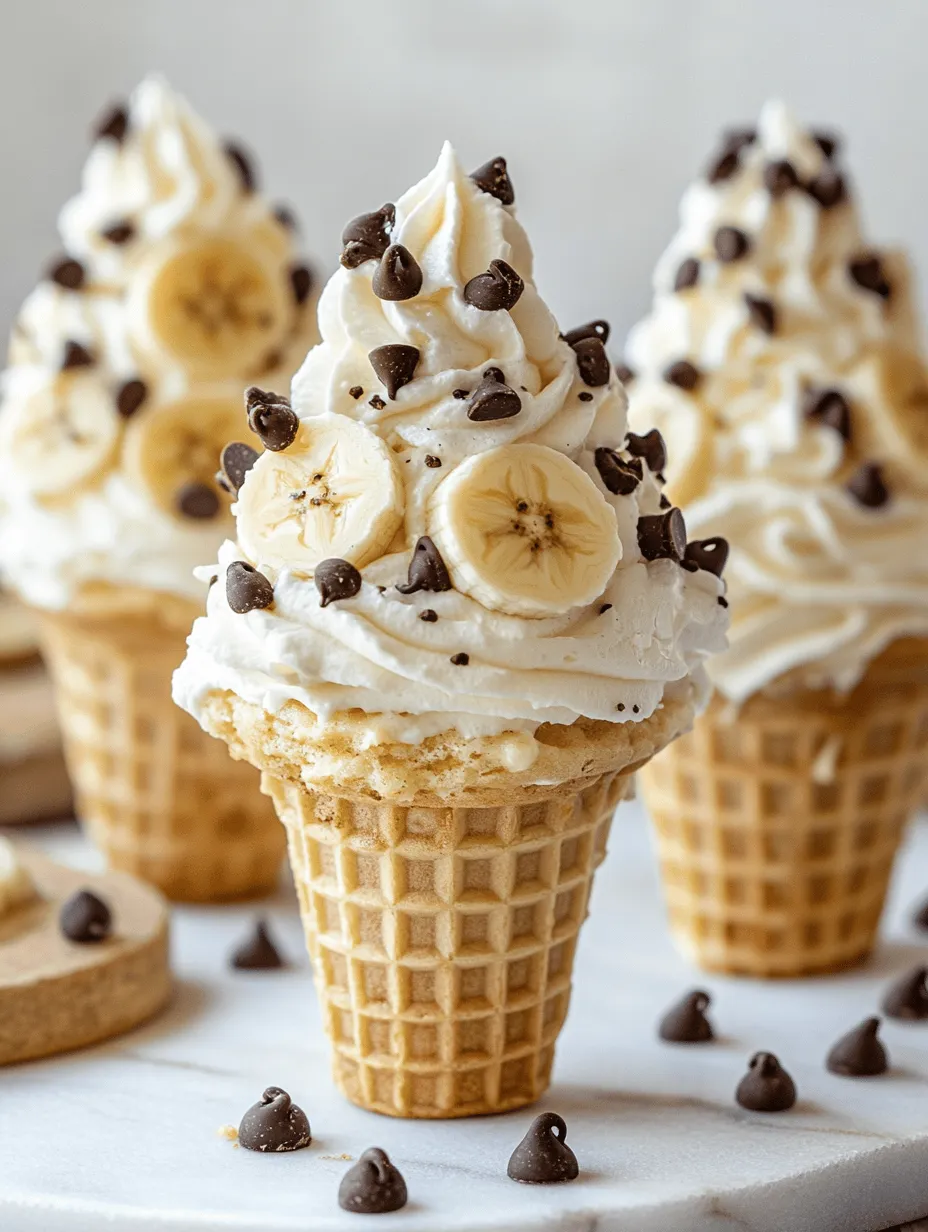
1. Whipped Cream: A dollop of freshly whipped cream on top of each cone adds an elegant touch. You can use a piping bag for a more decorative presentation.
2. Garnishes: Consider garnishing with mini chocolate chips or crushed nuts, such as pecans or walnuts, to add a delightful crunch. These toppings not only enhance the flavor but also add visual appeal.
3. Additional Toppings: For an extra layer of indulgence, drizzle some caramel sauce over the top or add pieces of fresh fruit for a vibrant touch. These additional toppings can elevate the dessert and make it even more irresistible.
Presentation Tips
1. Creative Serving Ideas: Arrange the cones in a decorative clear cup or a tall glass to showcase the beautiful layers. This method not only highlights the layers but also makes them easy to grab for guests.
2. Pairing Suggestions: Consider serving your cones alongside a refreshing beverage, such as iced tea or lemonade, which complements the sweetness of the dessert. Alternatively, they can be paired with a rich coffee for a delightful contrast.
Conclusion
The Banana Pudding Cheesecake Cones are not just a dessert; they are an experience that combines multiple flavors and textures in a fun, easy-to-enjoy format. With the right ingredients and a bit of creativity, you can delight your guests or family with this dessert that is sure to leave a lasting impression. Enjoy the process of making these cones and the joy they bring to your table. Whether you’re hosting a gathering or simply looking for an indulgent treat, these cones are a fantastic choice that will satisfy any sweet tooth.